Thursday, February 28, 2013

WIX CustomAction deferred versus immediate and the nightmare of Windows platform dotNet dependency

When it comes to using WIX everybody would agree that C# language is on the paper the easiest language to use to write a Custom Action.
When things get more complicated is that if you want to create a WIX installer for both Windows 7 and Windows8 then you need to
build each custom action to target both dotNet Framework 3.5 and dotNetFramework 4.0 unfortunately you will have to create two solution because
unlike Visual Studio C++ project the dotNet dependency applies to the entire solution and not the configuration at least this is what I noticed
on Visual Studio 2010.

You have to be very careful on when to decide that your CustomAction will be immediate and when it will be deferred.
If you use your custom action to install driver, install Windows Services, setup MYSQL ODBC connection, configure IIS or delete file from protected folder
then you need to use a deferred custom action.

While both deferred and immediate custom actions can run in the context of the user initiating the installation, only deferred custom actions can run elevated using the system context.
Deferred custom actions can only be sequenced between the InstallInitialize and InstallFinalize actions in execute sequence tables. Immediate custom actions, on the other hand, can be sequenced
anywhere within any of the sequence tables. Deferred custom actions are not executed immediately. Instead they are scheduled to run later during the execution script. The execution script isn't processed until the InstallExecute, InstallExecuteAgain, or InstallFinalize action is run.
Deferred custom actions cannot access the installation database. In fact, deferred custom actions have very limited access to the installation session because an installation script can be executed
outside of the installation session that created it. Immediate custom actions have access to the installation database and can read and set installation properties, modify feature and component
states, and add temporary columns, rows, and tables among other things.
Deferred custom actions should be used when the custom action must make a change to the system or call another system service. Additionally, only deferred custom actions can run in an elevated
context. If your custom action requires elevated privileges in order to run, your custom action needs to be marked as deferred. Custom actions marked to run in the system context
(msidbCustomActionTypeInScript + msidbCustomActionTypeNoImpersonate) will only run in the system context if the installation itself is elevated.

So let's look at how to solve the dependencencie issue first.

1 I recommend passing an argument to your WIX build script to create an MSI based on the targeted OS
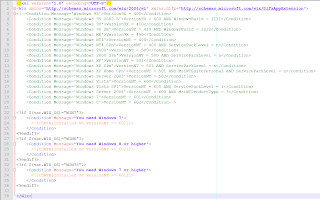


2 Dot Net Dependency

Make sure you know the build in version of dotNet on your targeted OS Win7 is 3.5 with fallback to 2.0
Windows 8 is 4.0 and deprecated support for 3.5


3 CustomAction deferred
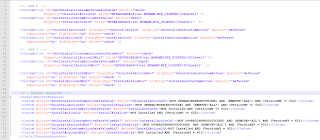


Inside your C# CustomAction you can only access property passed to you inside the Value attribute of the CustomAction

session.Message(InstallMessage.Warning,
new Record(new string[]
{
string.Format("MYVARIABLE: {0}",
session.CustomActionData["MYVARIABLE"])
}));

Direct access to the property will fail such as string UILevel = session["UILevel"];
You cannot change MSI property inside the CustomAction but you can cheat and log a dummy property if you expect to parse the installation log during a silent install
to check the response of your custom action. Rolling back custom action is not easy when you messed up with some third party application setting
so in some cases you have to return return ActionResult.Success regardless of the outcome and rely on a result code

EG

string strLog = string.Format("Property(S): ResultCode = {0}", Convert.ToString(1));
session.Log(strLog);

4 CustomAction immediate

For install custom action if your custom action rely on files deployed within your MIS to some target folder then make sure you change Before="InstallFinalize" to
After="InstallFinalize">
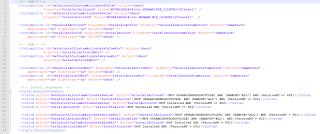


In this case you can access any property through the session object EG string UILevel = session["UILevel"]; and you can set a new property before exiting from your CustomAction
session["ResultCode"] = 1


Hope this article will help you solve Windows 7 and Windows 8 Installer issue

Friday, February 15, 2013

Very interesting article about Adobe Photoshop source code version 1

pho·to·shop, transitive verb, often capitalized \ˈfō-(ˌ)tō-ˌshäp\ 1.to alter (a digital image) with Photoshop software or other image-editing software especially in a way that distorts reality (as for deliberately deceptive purposes) – Merriam-Webster online dictionary, 2012 http://computerhistory.org/atchm/adobe-photoshop-source-code/

Thursday, February 14, 2013

Fast way to shrink VMWARE image

I am sure everyone noticed that when using a repository inside the VM the size of the VM on disk
keeps growing even when you delete branches or get rid of old Android repo like 2.3 and focus on the good
stuff Android 4.2 and work against the fragmentation of Google Android Platform where migration is key :)
To get more disk space, the key is to compact the VM once in a while.

The slow way

Normal commands for Linux VM are

1. Inside of VM-- $ sudo vmware-tools
a. Select “shrink” tab
b. Select “/” folder
c. Hit “shrink” button and enjoy the process
d. Repeat the same for “/boot” folder and for any other folders you might have there
2. Shutdown VM completely
3. From VMware menu find “Settings->Hardware->Hard Disk->Utilities->Defragment”
4. From VMware menu find “Settings->Hardware->Hard Disk->Utilities->Compact”


Now the fast way :

For Linux VM

In the VM, in a Terminal make sure you become root (sudo bash) and then copy and paste the following command, as is,
and then press Enter:

dd if=/dev/zero of=wipefile bs=1024x1024; rm wipefile

Wait for the command prompt to return and then shutdown the VM and then from the Virtual Machine Settings for the
Hard Disk select the Compact command from the Utilities button.

You’ll be able to spare a couple of Gigabyte !!

We are talking at least of a 2X gain easy.. I didn't benchmark yet because I am impatient to use the fast way only!
On Windows

Assuming the VMware virtual disk is not pre-allocated and the Filesystem is ext4 you will have to
manually prepare it to be shrunk. When Windows deletes a file, it doesn’t actually delete the data on the disk,
it just deletes the references/pointers in the file allocation tables. So when “shrink” is processing a vmdk and
is looking at the raw disk, it is seeing values that aren’t empty (non-zero) and export them as such.
So before doing a Shrink, use a really cool command line tool developed by Mark Russinovich SDelete.
Simply execute SDelete with parameter –c inside running Virtual Machine, then shut down the Guest
and do a Shrink

Wednesday, February 13, 2013

Installing Microsoft Update Standalone Packages Silently

MSU file extention are used to install Microsoft KB Hot Fixes. This process usually
display a dialog box similar to the Windows Update install dialog when installing
and at the end sometimes a reboot is needed.

As they use the same switches as the existing Microsoft updates,
installing them silently is very straightforward.

They are processed by a command named WUSA.EXE (Windows Update Standalone Installer),
so a command-line would look like this:

START /WAIT WUSA Windows6.0-KBNNNNNN-x86.msu /QUIET /NORESTART

Where 6.0 is the OS version

or

START /WAIT Windows6.0-KBNNNNNN-x86.msu /QUIET /NORESTART

You can run the WUSA command with /? to see a dialog box detailing the complete
help text:

wusa

wusa [/quiet] [/norestart]

/?, /h, /help – Display help information.

update – Full path of the MSU file.

/quiet – Quiet mode, no user interaction. reboot as needed

/norestart – When combined with /quiet, installer will NOT initiate reboot.
It is ignored if it is used alone

The following PowrShell Script will push a HOT FIX to a list of SERVERS

$Servers = $(1..176 | foreach {"SERVER$_"})

$HotfixPath = '\\Fileserver\Hotfixes\KB2464876\Windows6.0-KB2464876-x86.msu'

foreach ($Server in $Servers){
if (Test-Path "\\$Server\c$\Temp"){
Write-Host "Processing $Server..."
# Copy update package to local folder on server
Copy-Item $Hotfixpath "\\$Server\c$\Temp"
# Run command as SYSTEM via PsExec (-s switch)
& E:\SysinternalsSuite\PsExec -s \\$Server wusa C:\Temp\Windows6.0-KB2464876-x86.msu /quiet /norestart
if ($LastExitCode -eq 3010) {
$ConfirmReboot = $False
} else {
$ConfirmReboot = $True
}
# Delete local copy of update package
Remove-Item "\\$Server\c$\Temp\Windows6.0-KB2464876-x86.msu"
Write-Host "Restarting $Server..."
Restart-Computer -ComputerName $Server -Force -Confirm:$ConfirmReboot
Write-Host
} else {
Write-Host "Folder C:\Temp does not exist on the target server"
}
}

Tuesday, February 12, 2013

Which operating systems come with .net ?

.NET Framework 1.1: Windows Server 2003 .NET Framework 2.0: Windows Server 2003 R2 .NET Framework 3.0: Windows Vista, Windows Server 2008 .NET Framework 3.5 SP1: Windows 7, Windows Server 2008 R2 .NET Framework 4.0: Windows 8 .NET Framework 4.5: Windows 8 .NET Compact Framework 1.0 (SP2): Windows Mobile 5.0 .NET Compact Framework 2.0: Windows Mobile 6.0 Mono 1.1.13.6: Ubuntu Dapper (6.06 LTS) Mono 1.2.6: Ubuntu Hardy (8.04 LTS) Mono 2.4.2.3: Ubuntu Karmic (9.10) Mono 2.4 branch snapshot: Ubuntu Lucid (10.04 LTS) Mono 2.6.7: Ubuntu Maverick (10.10), Ubuntu Natty (11.04)