Personally I’ve always appreciated the emphasis on Populi versus Dei especially considering tumultuous, fractious and socialist history of Europe. But what it expresses best is the materialistic notion that perfection, i.e. God, is possible from the voice of the people and that truth resides in each and everyone of us. So this is my food for thoughts blog article about software technology. If you found article on this blog useful, click on any ad so that I can have a drink on you.
For GPS data, I created one heck of a messy route. I included the running track, two sets of extremely long tunnels/bridges, running a loop next to a stadium, running on a small island, going through the forest, and just meandering. I had with me a FR745, Fitbit Sense, and of course the Apple Watch Series 6. Due to various embargos, I can’t quite share the Fitbit data until next week. So here’s the GPS data versus the FR745:
And a bit closer:
I went into this in detail in the video, or you can zoom in on the set here. But the main takeaways are:
– Holy crap, Apple finally got rid of the Mario Kart/Swooshing/Sashaying corner effect – The Apple Watch and FR745 were very close – The FR745 actually nailed the track, despite not being in track mode (hmm…interesting thoughts on that later) – The Apple Watch struggled a little bit around the stadium, but we’re talking mostly just a few meters – There were a few sections it wobbled slightly on some straightaways – Both were great in the tunnels – Both were great in the forest
So, the biggest takeaway is that Apple has clearly traded some of the over-smoothing they’ve done since the very beginning of Apple Watch, with a bit more ‘trueness’ for where the watch actually goes (or, where it thinks it goes). This means that you get a bit more wobble in some cases compared to the past, but it also means it doesn’t cut or sweep around corners like it used to. As a reminder from the Series 5, this is that sweeping I was talking about there (these are from the Series 5 review). You can see how it heavily smooths my twists and turns on the path.
Now, Apple has continued to make progress on this since last year. Every once in a while I’ll do tests with it, and I’ve seen them slowly find that balance better and better. But I think at this point they’re acting much closer to a normal GPS watch than the heavily smoothed Apple Watch.
Back in April 2017, Google announced that it will be shipping Headless Chrome in Chrome 59. Since the respective flags are already available on Chrome Canary, the Duo Labs team thought it would be fun to test things out and also provide a brief introduction to driving Chrome using Selenium and Python.
Browser Automation
Before we dive into any code, let’s talk about what a headless browser is and why it’s useful. In short, headless browsers are web browsers without a graphical user interface (GUI) and are usually controlled programmatically or via a command-line interface.
One of the many use cases for headless browsers is automating usability testing or testing browser interactions. If you’re trying to check how a page may render in a different browser or confirm that page elements are present after a user initiates a certain workflow, using a headless browser can provide a lot of assistance. In addition to this, traditional web-oriented tasks like web scraping can be difficult to do if the content is rendered dynamically (say, via Javascript). Using a headless browser allows easy access to this content because the content is rendered exactly as it would be in a full browser.
Headless Chrome and Python
The Dark Ages
Prior to the release of Headless Chrome, any time that you did any automated driving of Chrome that potentially involved several windows or tabs, you had to worry about the CPU and/or memory usage. Both are associated with having to display the browser with the rendered graphics from the URL that was requested.
When using a headless browser, we don’t have to worry about that. As a result, we can expect lower memory overhead and faster execution for the scripts that we write.
Going Headless
Setup
Before we get started, we need to install Chrome Canary and download the latest ChromeDriver (currently 5.29).
Next, let’s make a folder that will contain all of our files:
$ mkdir going_headless
Now we can move the ChromeDriver into the directory that we just made:
$ mv Downloads/chromedriver going_headless/
Since we are using Selenium with Python, it’s a good idea to make a Python virtual environment. I use virtualenv, so if you use another virtual environment manager, the commands may be different.
The next thing we need to do is install Selenium. If you’re not familiar with Selenium, it’s a suite of tools that allows developers to programmatically drive web browsers. It has language bindings for Java, C#, Ruby, Javascript (Node), and Python. To install the Selenium package for Python, we can run the following:
$ pip install selenium
Example
Now that we’ve gotten all of that out of the way, let’s get to the fun part. Our goal is to write a script that searches for my name “Olabode” on duo.com, and checks that a recent article I wrote about Android security is listed in the results. If you’ve followed the instructions above, you can use the headless version of Chrome Canary with Selenium like so:
import os
from selenium import webdriver
from selenium.webdriver.common.keys import Keys
from selenium.webdriver.chrome.options import Options

chrome_options = Options()
chrome_options.add_argument("--headless")
chrome_options.binary_location = '/Applications/Google Chrome   Canary.app/Contents/MacOS/Google Chrome Canary'`

driver = webdriver.Chrome(executable_path=os.path.abspath(“chromedriver"),   chrome_options=chrome_options)
driver.get("http://www.duo.com")`

magnifying_glass = driver.find_element_by_id("js-open-icon")
if magnifying_glass.is_displayed():
  magnifying_glass.click()
else:
  menu_button = driver.find_element_by_css_selector(".menu-trigger.local")
  menu_button.click()`

search_field = driver.find_element_by_id("site-search")
search_field.clear()
search_field.send_keys("Olabode")
search_field.send_keys(Keys.RETURN)
assert "Looking Back at Android Security in 2016" in driver.page_source   driver.close()`
Example Explained
Let’s break down what’s going on in the script. We start by importing the requisite modules. The Keys provides keys in the keyboard like RETURN, F1, ALT, etc.
import os
from selenium import webdriver
from selenium.webdriver.chrome.options import Options
from selenium.webdriver.common.keys import Keys
Next, we create a ChromeOptions object which will allow us to set the location of the Chrome binary that we would like to use and also pass the headless argument. If you leave out the headless argument, you will see the browser window pop up and search for my name.
In addition, if you don’t set the binary location to the location of Chrome Canary on your system, the current version of Google Chrome that is installed will be used. I wrote this tutorial on a Mac, but you can find the location of the file on other platforms here. You just need to substitute Chrome for Chrome Canary in the respective file paths.
The driver.get function will be used navigate to the specified URL.
driver.get("https://www.duo.com")
The duo.com website is responsive, so we have to handle different conditions. As a result, we check to see if the expected search button is displayed. If it isn’t, we click the menu button to enter our search term.
We check to make sure that the blog post title from one of my most recent posts is in the page’s source.
assert "Looking Back at Android Security in 2016" in driver.page_source
And finally, we close the browser.
driver.close().
Benchmarks
Head to Headless
So, it’s cool that we can now control Chrome using Selenium and Python without having to see a browser window, but we are more interested in the performance benefits we talked about earlier. Using the same script above, we profiled the time it took to complete the tasks, peak memory usage, and CPU percentage. We polled CPU and memory usage with psutil and measured the time for task completion using timeit.
Headless (60.0.3102.0)
Headed (60.0.3102.0)
Median Time
5.29 seconds
5.51 seconds
Median Memory Use
25.3 MiB
25.47 MiB
Average CPU Percentage
1.92%
2.02%
For our small script, there were very small differences in the amount of time taken to complete the task (4.3%), memory usage (.5%), and CPU percentage (5.2%). While the gains in our example were very minimal, these gains would prove to be beneficial in a test suite with dozens of tests.
Manual vs. Adhoc
In the script above, we start the ChromeDriver server process when we create the WebDriver object and it is terminated when we call quit(). For a one-off script, that isn’t a problem, but this can waste a nontrivial amount of time for a large test suite that creates a ChromeDriver instance for each test. Luckily, we can manually start and stop the server ourselves, and it only requires a few changes to the script above.
Example Snippet
import os
from selenium import webdriver
from selenium.webdriver.common.keys import Keys
from selenium.webdriver.chrome.options import Options

service = webdriver.chrome.service.Service(os.path.abspath(“chromedriver"))
service.start()

chrome_options = Options()
chrome_options.add_argument("--headless")

# path to the binary of Chrome Canary that we installed earlier
chrome_options.binary_location = '/Applications/Google Chrome   Canary.app/Contents/MacOS/Google Chrome Canary'

driver = webdriver.Remote(service.service_url,   desired_capabilities=chrome_options.to_capabilities())
Snippet Explained
While there are only three lines of code that have changed, let’s talk about what’s going on in them. In order to manually control the ChromeDriver server, we have to use the ChromeDriverService. We do so by creating a service object with a path to the ChromeDriver and then we can start the service.
service = webdriver.chrome.service.Service(os.path.abspath(“chromedriver"))
service.start()
The final thing we have to do is create a WebDriver that can connect to a remote server. In order to use Chrome Canary and the headless portion, we have to pass the the dictionary of all the options since the remote WebDriver object doesn’t accept an Option object.
By adding the manual starting of the service, we saw the expected speed increases. The median time for the headless and headed browser to complete the tasks in the script decreased by 11% (4.72 seconds) and respectively 4% (5.29 seconds).
Headed Browser
Headless Browser
Median Time(% decrease)
4%
11%
Median Time (Seconds)
5.29 seconds
4.72 seconds
DOCKER AMAZON INSTANCE
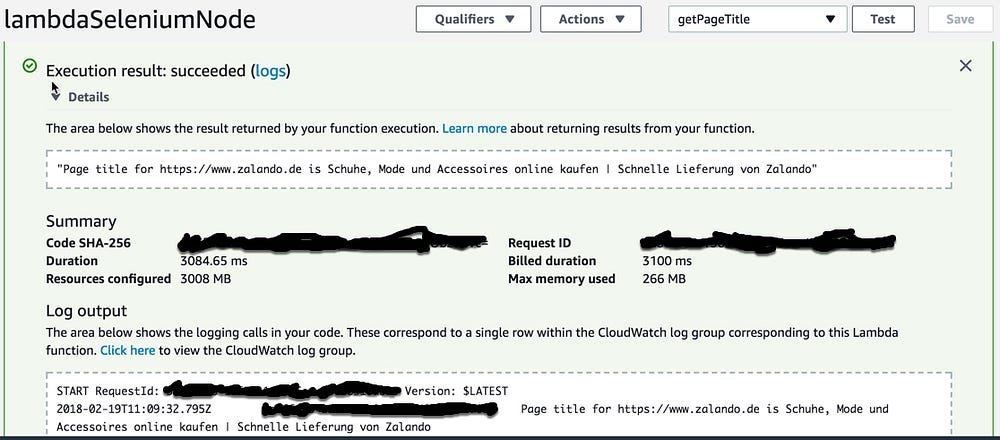
Part 1 — Use Selenium Webdriver and Chrome inside AWS Lambda
What is AWS Lambda?
Amazon explains, AWS Lambda (λ) as a ‘serverless’ compute service, meaning the developers, don’t have to worry about which AWS resources to launch, or how will they manage them, they just put the code on lambda and it runs, it’s that simple! It helps you to focus on core-competency i.e. App Building or the code.
Where will I use AWS Lambda?
AWS Lambda executes your backend code, by automatically managing the AWS resources. When we say ‘manage’, it includes launching or terminating instances, health checkups, auto scaling, updating or patching new updates etc.
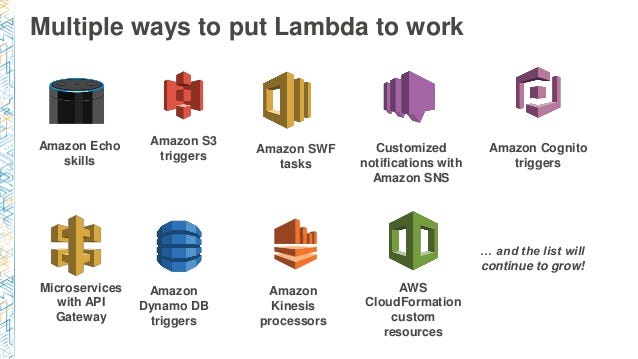
You can use it with multiple services
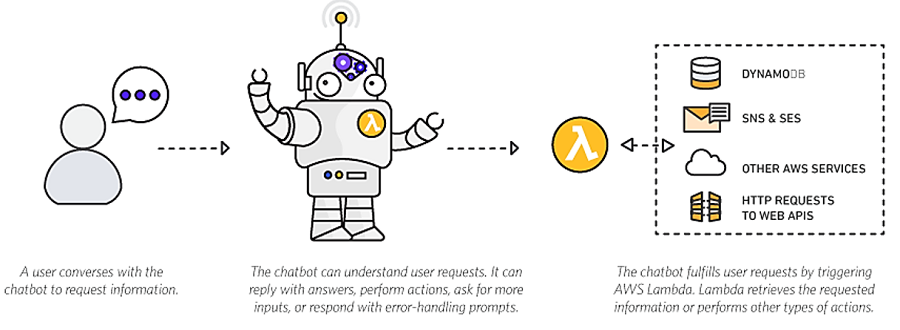
And also you can use it with Chatbot
So, how does it work?
The code that you want Lambda to run is known as a Lambda function. Now, as we know a function runs only when it is called, right? Here, Event Source is the entity which triggers a Lambda Function, and then the task is executed.
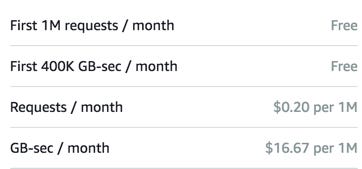
Pricing in AWS Lambda
Like most of the AWS services, AWS Lambda is also a pay per use service, meaning you only pay what you use, therefore you are charged on the following parameters
The number of requests that you make to your lambda function
The duration for which your code executes.
* Source: AWS official website
How to use Selenium Webdriver and Chrome inside AWS Lambda?
Note:
We will use Chromium version 62 in headless mode
You need to have AWS Account , if you don’t have one you can your own account from this link
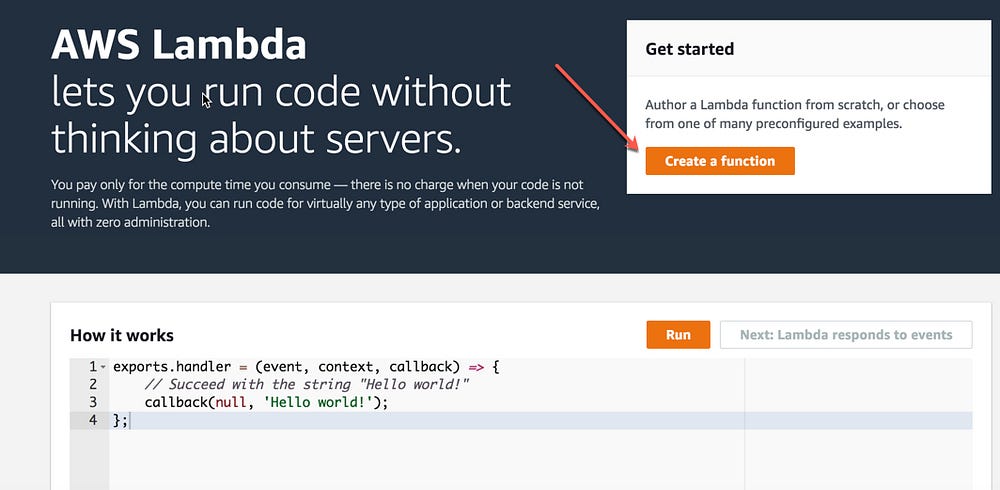
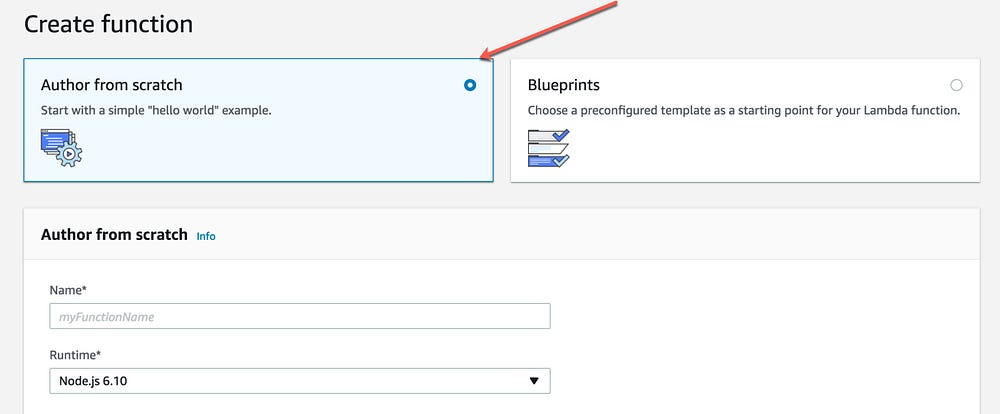
1- Login to AWS Management Console and Select AWS Lambda from Compute Services
2- Click on Create new a function
3- Select option Create from scratch (default select)
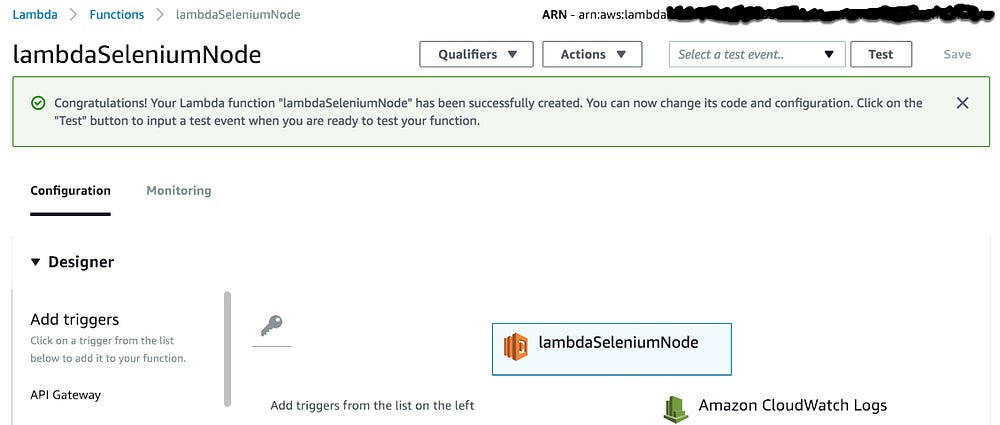
4- Add the function name and create new role and click on Create Button
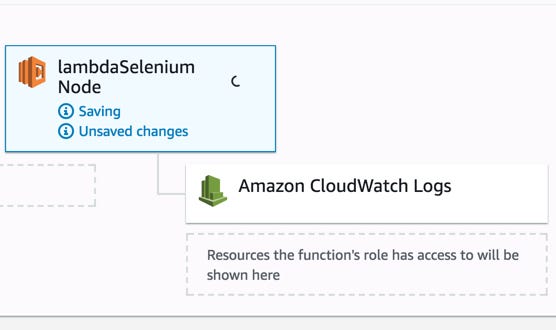
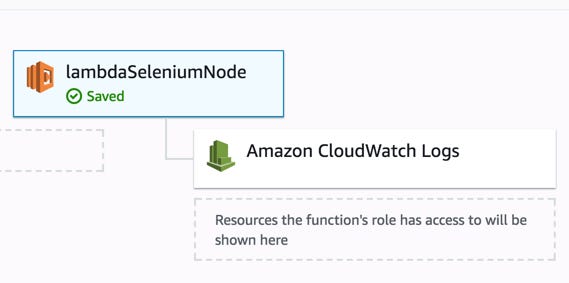
5- Congratulation you create your first Lambda function
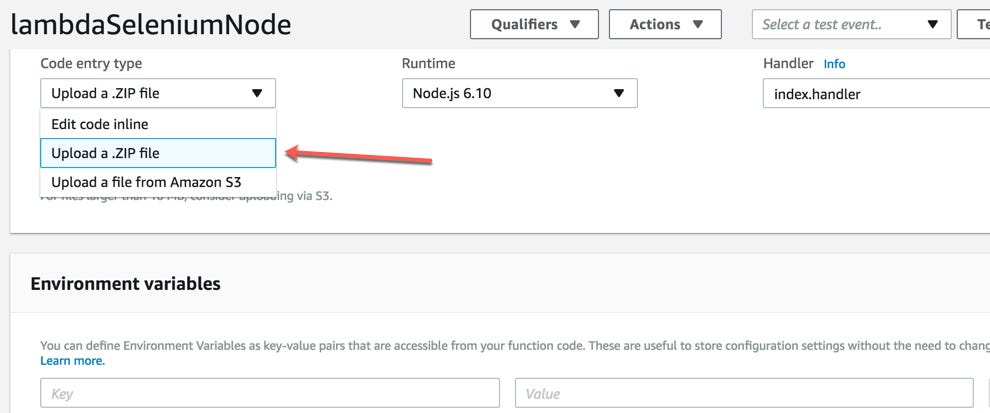
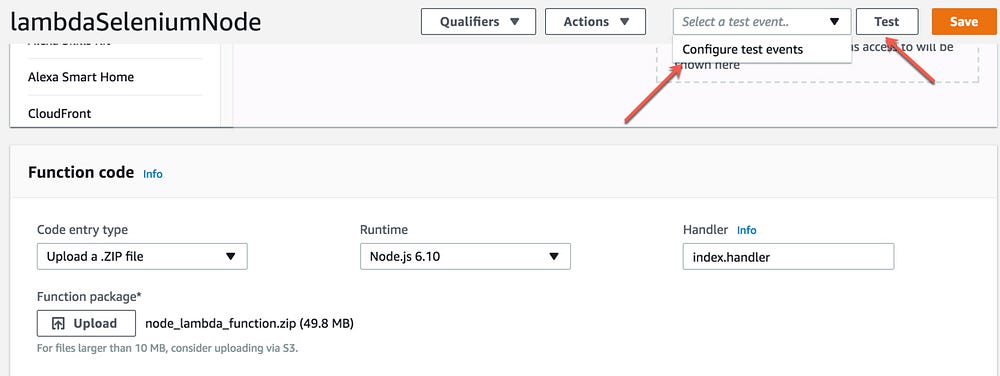
6- Select that you will upload the code from .zip folder
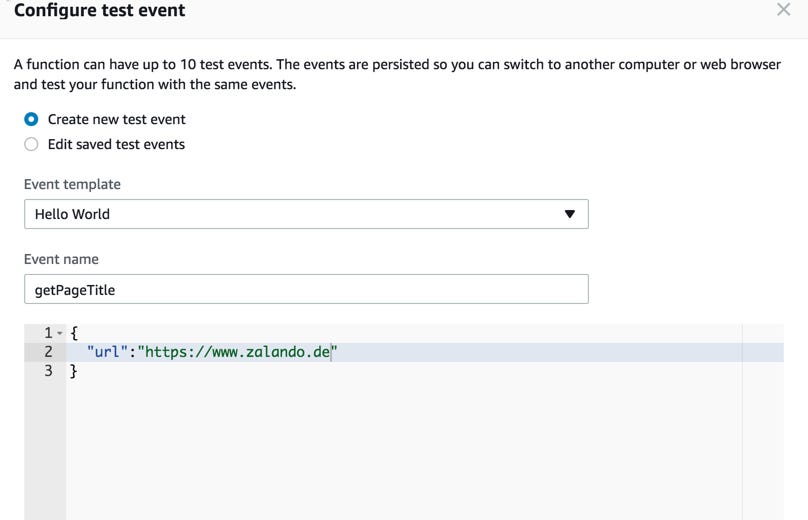
7- upload the file that you downloaded from this link
"Windows Subsystem for Linux" (also known as "Bash on Ubuntu on Windows")
folks try to:
Minimize it - "Oh, it's just Cygwin." (It's actually not, it's the actual Ubuntu elf binaries running on a layer that abstracts the Linux kernel.)
Design it - "So it's a docker container? A VM?" (Again, it's a whole subsystem. It does WAY more than you'd think, and it's FASTer than a VM.)
Here's a simple explanation from Andrew Pardoe Principal Program Manager, MSVC Compiler and Tools - Microsoft
1. The developer/user uses a bash shell.
2. The bash shell runs on an install of Ubuntu
3. The Ubuntu install runs on a Windows subsystem. This subsystem is designed to support Linux.
It's pretty cool. WSL has, frankly, kept me running Windows because I can run cmd, powershell, OR bash (or zsh or Fish). You can run vim, emacs, tmux, and run Javascript/node.js, Ruby, Python, C/C++, C# & F#, Rust, Go, and more. You can also now run sshd, MySQL, Apache, lighttpd as long as you know that when you close your last console the background services will shut down. Bash on Windows is for developers, not background server apps. And of course, you apt-get your way to glory.
Bash on Windows runs Ubuntu user-mode binaries provided by Canonical. This means the command-line utilities are the same as those that run within a native Ubuntu environment.
Install/Enable the Windows Subsystem for Linux
Enable the "Windows Subsystem for Linux" optional feature and reboot.
-- Beta feature --
This will install Ubuntu on Windows, distributed by Canonical
and licensed under its terms available here: https://aka.ms/uowterms
Type "y" to continue: y
Downloading from the Windows Store... 100%
Extracting filesystem, this will take a few minutes...
Please create a default UNIX user account. The username does not need to match your Windows username.
For more information visit: https://aka.ms/wslusers
Enter new UNIX username: gps
Password: brcm1234
Then, from the bash shell make sure you have build-essential, gdb's server, and openssh's server:
$ sudo apt update
$ sudo apt install -y build-essential
$ sudo apt install -y gdbserver
$ sudo apt install -y openssh-server
Then open up /etc/ssh/sshd_config with vi (or nano) like
sudo nano /etc/ssh/sshd_config
and for simplicity's sake, set PasswordAuthentication to yes. Remember that it's not as big a security issue as you'd think as the SSHD daemon closes when your last console does, and because WSL's subsystem has to play well with Windows, it's privy to the Windows Firewall and all its existing rules, plus we're talking localhost also.
Now generate SSH keys and manually start the service:
$ sudo ssh-keygen -A
$ sudo service ssh start
Connect your build system for Linux to use port 22
username gps
password brcm1234
How connect to your Visual Studio
Getting Started
Visual C++ for Linux Development
Setting up your project for Linux Development
With this workload you can author C++ code for Linux servers, desktops and devices. You can manage your connections to these machines from within VS. VS will automatically copy and remotely build your sources and can launch your application with the debugger. Our project system supports targeting specific architectures, including ARM.
Connecting to Linux
Prerequisites
Today we only support building remotely on the Linux target machine. We are not limited by specific Linux distros but we do have dependencies on the presence of some tools. Specifically, we need openssh-server, g++, gdb and gdbserver. Use your favorite package manager to install them, e.g. on Debian based systems: sudo apt-get install openssh-server g++ gdb gdbserver
First connection
The first time you target a Linux machine you will be prompted for connection information. This is triggered by building the project.
On your Visual Studio go to Tools > Options > Cross Platform > Linux and enter the credential
Hostname: IP or hostname of your docker host
Port: The port you have pass in the previous command ( 12345 for example)
Username: gps
Authentication type: password
Password: brcm1234
Adding and removing connections
To add a new connection, go to Tools > Options and search for Connection, Connection Manager will be under Cross Platform. From here you can add and remove connections.
To change which connection a project is using go to the project properties general settings and update the Remote Build Machine option.
Project Properties
All of the options necessary to control C++ compilation are exposed on the project properies pages. We'll cover a few specific to how things work for Linux. First under general settings, you will see the remote root is set to ~/projects/ by default and that we are setting the remote project directory to match our project name in that location.
Looking at the General settings for the project, you can see how our output and intermediate directories were configured. Additionally, you’ll see that this project was configured as an application – thus our executable is under bin/x64/Debug/ as ConsoleApplication1.out. Notice that for configuration types we also support static and dynamic libraries.
Add additional library dependencies on the Linker > Input property page.
You can pass additional pre launch commands to the debugger to do things like launch graphical apps on the remote linux machine.
You can also send post build events to control remote behavior, as in this example that exports a gpio pin for use without requiring the executable run as super user.
Console window
The Linux workload has a console window tailored for interacting with your remote executables. This window shows not just the output of your program but can also take input. To activate this window, use the menu Debug, Linux Console.
Now you can attach to gdbserver running inside bash ubuntu on your local Windows 10
=thread-group-added,id="i1"
GNU gdb (GDB) 7.9
Copyright (C) 2015 Free Software Foundation, Inc.
License GPLv3+: GNU GPL version 3 or later
This is free software: you are free to change and redistribute it.
There is NO WARRANTY, to the extent permitted by law.  Type "show copying"
and "show warranty" for details.
This GDB was configured as "--host=i686-pc-mingw32 --target=x86_64-linux-gnu".
Type "show configuration" for configuration details.
For bug reporting instructions, please see:
.
Find the GDB manual and other documentation resources online at:
.
For help, type "help".
Type "apropos word" to search for commands related to "word".
=cmd-param-changed,param="pagination",value="off"
Loaded 'shared libraries loaded at this time.'. Cannot find or open the symbol file.
Stopped due to shared library event:
  Inferior loaded /lib/x86_64-linux-gnu/libc.so.6
    /lib64/ld-linux-x86-64.so.2
Loaded '/lib/x86_64-linux-gnu/libc.so.6'. Cannot find or open the symbol file.
Loaded '/lib64/ld-linux-x86-64.so.2'. Cannot find or open the symbol file.
Breakpoint 1, main () at /home/gps/projects/ConsoleApplication1/main.cpp:5
Kill the program being debugged? (y or n) [answered Y; input not from terminal]
The program '' has exited with code 0 (0x0).