Wednesday, November 13, 2013
Tuesday, November 12, 2013
How to create PDF document from doxygen
How to create PDF documentation with Doxygen/MiKTeX automatically
Let us suppose you need to make API Reference Guide with Doxygen as a PDF file.
You can do it in several steps:
1. Your development environment should have make tool.
Cygwin is a good one
2. Download distributives for the following software:
Doxygen - http://www.stack.nl/~dimitri/doxygen/
ghostscript http://pages.cs.wisc.edu/~ghost/
Miktex http://www.miktex.org/
or much active TeX Live
TeX Live 2013 is available over the Internet and on DVD. It was released on 18 June 2013
http://www.tug.org/texlive/
http://www.tug.org/texlive/acquire-netinstall.html
Graphviz http://www.graphviz.org/ - optionally
3. Install Doxygen. Now you are able to create a configuration file for your doxy-documentation. Use Doxywizard for that purpose: File -> Save as...
#---------------------------------------------------------------------------
# configuration options related to the LaTeX output
#---------------------------------------------------------------------------
GENERATE_LATEX = YES
LATEX_OUTPUT = doxygen/latex
LATEX_CMD_NAME = latex
MAKEINDEX_CMD_NAME = makeindex
COMPACT_LATEX = NO
PAPER_TYPE = letter
EXTRA_PACKAGES =
LATEX_HEADER =
PDF_HYPERLINKS = YES
USE_PDFLATEX = NO
LATEX_BATCHMODE = NO
LATEX_HIDE_INDICES = YES

4. Install Ghostscript.
4.1 http://www.ghostscript.com/download/
Add ghostscript installation directory to your PATH environment variable
EG: C:\Program Files\gs\gs9.10\bin
4.2 install Ghostview

5. Install Miktex (note that the release will be discontinued end of 2013).

OR
5. Install TexLive
download and unzip installation package and run
install-tl-advanced.bat


be patient it takes some time..
or
6. Update Miktex.
a. Pick appropriate shortcut (with Admin access for Win7)

b. Pick the nearest package repository


Once the version of miktex has been updated start the update over. This time you'll be able to select all packages

Note Updated to work with Ubuntu 10.04 and TeXLive 2009-7
TeX Live 2013 is available over the Internet and on DVD. It was released on 18 June 2013
Installing LaTeX in Ubuntu is actually quite straightforward,
but this guide is a good entry point for other LaTeX tips.
I assume that Ubuntu is already installed on the target machine.
Make sure that Ubuntu is fully updated by running the Update Manager from the System→Administration menu.
Install LaTeX by entering the following in a Terminal.
you can install the full distribution; it has the advantage that you most likely don't have to install any packages afterwards, but at the
cost of disk space - it installs more than a gigabyte of fetish rubber packages including language packages that you will probably never need. You may need to enter your
password to execute the command.
$> sudo apt-get install texlive-full
or
Alternatively you can select to install a complete distribution that only includes the language packages you need by specifying each package to install
$> sudo apt-get install texlive-base
$> sudo apt-get install texlive-binaries
$> sudo apt-get install texlive-common
$> sudo apt-get install texlive-latex-base
$> sudo apt-get install texlive-publishers
$> sudo apt-get install texlive-music
$> sudo apt-get install texlive-latex3
$> sudo apt-get install texlive-generic-recommended
$> sudo apt-get install texlive-omega
$> sudo apt-get install texlive-font-utils
$> sudo apt-get install texlive-plain-extra
$> sudo apt-get install texlive-formats-extra
$> sudo apt-get install texlive-games
$> sudo apt-get install texlive-metapost
$> sudo apt-get install texlive-generic-extra
$> sudo apt-get install texlive-pictures
$> sudo apt-get install texlive-math-extra
$> sudo apt-get install texlive-extra-utils
$> sudo apt-get install texlive-latex-recommended
$> sudo apt-get install texlive-bibtex-extra
$> sudo apt-get install texlive-humanities
$> sudo apt-get install texlive-fonts-recommended
$> sudo apt-get install texlive-pstricks
$> sudo apt-get install texlive-science
$> sudo apt-get install texlive-fonts-extra-doc
$> sudo apt-get install texlive-latex-base-doc
$> sudo apt-get install texlive-doc-base
$> sudo apt-get install texlive-latex-recommended-doc
$> sudo apt-get install texlive-humanities-doc
$> sudo apt-get install texlive-pstricks-doc
$> sudo apt-get install texlive-science-doc
$> sudo apt-get install texlive-metapost-doc
$> sudo apt-get install texlive-pictures-doc
$> sudo apt-get install texlive-latex-extra-doc
$> sudo apt-get install texlive-publishers-doc
$> sudo apt-get install texlive-fonts-recommended-doc
$> sudo apt-get install texlive-doc-en
$> sudo apt-get install texlive-lang-danish
$> sudo apt-get install texlive-lang-ukenglish
$> sudo apt-get install texlive-lang-german
$> sudo apt-get install texlive-lang-french
$> sudo apt-get install texlive-lang-greek
$> sudo apt-get install feynmf
$> sudo apt-get install tex4ht
$> sudo apt-get install tex4ht-common
$> sudo apt-get install texinfo tex-common
$> sudo apt-get install libkpathsea5
$> sudo apt-get install libkpathsea-dev
$> sudo apt-get install pgf
$> sudo apt-get install dvipng
$> sudo apt-get install latex-xft-fonts
$> sudo apt-get install xfonts-mathml
$> sudo apt-get install musixtex
$> sudo apt-get install musixlyr
$> sudo apt-get install latex-sanskrit
$> sudo apt-get install latex-xcolor
$> sudo apt-get install lacheck ps2eps
$> sudo apt-get install latex-beamer
$> sudo apt-get install cm-super
$> sudo apt-get install cm-super-minimal
$> sudo apt-get install context
$> sudo apt-get install musixtex-slurps
$> sudo apt-get install preview-latex-style
$> sudo apt-get install prosper
$> sudo apt-get install tipa
$> sudo apt-get install lmodern
$> sudo apt-get install lcdf-typetools
Note that the above installs language packages for Danish, Greek, German and French (English is part of the standard distribution and is always installed).
Now you have a full working LaTeX distribution installed and you can compile your LaTeX document by running
$> pdflatex filename.tex
That is actually how simple it is. I recommend to use either gedit (part of Ubuntu installation) or Eclipse (can be installed using the Synaptics Package Manager or apt-get) to write LaTeX documents, but
you can use whichever plain text editor you prefer.
7. Install Graphviz (optionally)
8. Create makefile with complete scenario.
####################################################################
#
# This is makefile for doxygen documentation.
#
####################################################################
include ./rules
ifeq ($(HOST_OS),WIN)
all:
cd $(PROJECT_PATH)/doc; \
$(DOXYGEN_PATH)/doxygen Doxyfile > doxylog.log; \
cp $(PROJECT_PATH)/doc/conf/Makefile $(PROJECT_PATH)/doc/latex/Makefile; \
cp $(PROJECT_PATH)/doc/conf/pdflatex.input $(PROJECT_PATH)/doc/latex/pdflatex.input; \
cd $(PROJECT_PATH)/doc/latex; \
$(DOXYGEN_MAKE_PATH)/make; \
$(RM) refman.pdf; \
$(DOXYGEN_MAKE_PATH)/make; \
cp $(PROJECT_PATH)/doc/latex/refman.pdf $(PROJECT_PATH)/doc/$(DOCNAME).pdf
clean:
$(RM) $(PROJECT_PATH)/doc/html/*.*; \
$(RM) $(PROJECT_PATH)/doc/latex/*.*
endif
$(DOXYGEN_PATH)/doxygen is the path to the doxygen.exe file,
Doxyfile is the name of your doxy-configuration file,
doxylog.log is the output file to analyze warnings and errors,
pdflatex.input is the helpful file with an answer to all questions. Just letter r. This answer helps you avoid manually typing using a keyboard.
r
$(PROJECT_PATH)/doc/conf/Makefile is the additional makefile especially to create manual.pdf file
With the TexLive package the following Makefile will be autognerated
all: clean refman.dvi
ps: refman.ps
pdf: refman.pdf
ps_2on1: refman_2on1.ps
pdf_2on1: refman_2on1.pdf
refman.ps: refman.dvi
dvips -o refman.ps refman.dvi
refman.pdf: refman.ps
gswin32c -q -dNOPAUSE -dBATCH -sDEVICE=pdfwrite -sOutputFile=refman.pdf -c save pop -f refman.ps
refman.dvi: refman.tex doxygen.sty
echo "Running latex..."
latex refman.tex
echo "Running makeindex..."
makeindex refman.idx
echo "Rerunning latex...."
latex refman.tex
latex_count=5 ; \
while egrep -s 'Rerun (LaTeX|to get cross-references right)' refman.log && [ $$latex_count -gt 0 ] ;\
do \
echo "Rerunning latex...." ;\
latex refman.tex ;\
latex_count=`expr $$latex_count - 1` ;\
done
refman_2on1.ps: refman.ps
psnup -2 refman.ps >refman_2on1.ps
refman_2on1.pdf: refman_2on1.ps
gswin32c -q -dNOPAUSE -dBATCH -sDEVICE=pdfwrite -sOutputFile=refman_2on1.pdf -c save pop -f refman_2on1.ps
clean:
rm -f *.ps *.dvi *.aux *.toc *.idx *.ind *.ilg *.log *.out refman.pdf
and the last hint is using double building due to well known bug with page indexes
$(DOXYGEN_MAKE_PATH)/make; \
$(RM) manual.pdf; \
$(DOXYGEN_MAKE_PATH)/make; \
simply typing make doc in the root project's directory.
at the end of make all inside the latex sub folder you should see
(see the transcript file for additional information)
Output written on refman.dvi (1873 pages, 6754516 bytes).
Transcript written on refman.log.
Let us suppose you need to make API Reference Guide with Doxygen as a PDF file.
You can do it in several steps:
1. Your development environment should have make tool.
Cygwin is a good one
2. Download distributives for the following software:
Doxygen - http://www.stack.nl/~dimitri/doxygen/
ghostscript http://pages.cs.wisc.edu/~ghost/
Miktex http://www.miktex.org/
or much active TeX Live
TeX Live 2013 is available over the Internet and on DVD. It was released on 18 June 2013
http://www.tug.org/texlive/
http://www.tug.org/texlive/acquire-netinstall.html
Graphviz http://www.graphviz.org/ - optionally
3. Install Doxygen. Now you are able to create a configuration file for your doxy-documentation. Use Doxywizard for that purpose: File -> Save as...
#---------------------------------------------------------------------------
# configuration options related to the LaTeX output
#---------------------------------------------------------------------------
GENERATE_LATEX = YES
LATEX_OUTPUT = doxygen/latex
LATEX_CMD_NAME = latex
MAKEINDEX_CMD_NAME = makeindex
COMPACT_LATEX = NO
PAPER_TYPE = letter
EXTRA_PACKAGES =
LATEX_HEADER =
PDF_HYPERLINKS = YES
USE_PDFLATEX = NO
LATEX_BATCHMODE = NO
LATEX_HIDE_INDICES = YES

4. Install Ghostscript.
4.1 http://www.ghostscript.com/download/
Add ghostscript installation directory to your PATH environment variable
EG: C:\Program Files\gs\gs9.10\bin
4.2 install Ghostview

5. Install Miktex (note that the release will be discontinued end of 2013).

OR
5. Install TexLive
Windows
download and unzip installation package and run
install-tl-advanced.bat


be patient it takes some time..
or
6. Update Miktex.
a. Pick appropriate shortcut (with Admin access for Win7)

b. Pick the nearest package repository


Once the version of miktex has been updated start the update over. This time you'll be able to select all packages

When Doxygen is finished processing,
in the latex directory there's a file called 'refman.tex'.
There are three ways you can use
that file to get 'a book' out of Doxygen:
·
LaTeX -> dvips -> ps2pdf
latex myfile
dvips myfile
ps2pdf myfile.ps
·
LaTeX -> dvipdfm
latex myfile
dvipdfm myfile
·
pdflatex (or pdftex for plain TeX)
pdflatex myfile
On Ubuntu
Install LaTeX in UbuntuNote Updated to work with Ubuntu 10.04 and TeXLive 2009-7
TeX Live 2013 is available over the Internet and on DVD. It was released on 18 June 2013
Installing LaTeX in Ubuntu is actually quite straightforward,
but this guide is a good entry point for other LaTeX tips.
I assume that Ubuntu is already installed on the target machine.
Make sure that Ubuntu is fully updated by running the Update Manager from the System→Administration menu.
Install LaTeX by entering the following in a Terminal.
you can install the full distribution; it has the advantage that you most likely don't have to install any packages afterwards, but at the
cost of disk space - it installs more than a gigabyte of fetish rubber packages including language packages that you will probably never need. You may need to enter your
password to execute the command.
$> sudo apt-get install texlive-full
or
Alternatively you can select to install a complete distribution that only includes the language packages you need by specifying each package to install
$> sudo apt-get install texlive-base
$> sudo apt-get install texlive-binaries
$> sudo apt-get install texlive-common
$> sudo apt-get install texlive-latex-base
$> sudo apt-get install texlive-publishers
$> sudo apt-get install texlive-music
$> sudo apt-get install texlive-latex3
$> sudo apt-get install texlive-generic-recommended
$> sudo apt-get install texlive-omega
$> sudo apt-get install texlive-font-utils
$> sudo apt-get install texlive-plain-extra
$> sudo apt-get install texlive-formats-extra
$> sudo apt-get install texlive-games
$> sudo apt-get install texlive-metapost
$> sudo apt-get install texlive-generic-extra
$> sudo apt-get install texlive-pictures
$> sudo apt-get install texlive-math-extra
$> sudo apt-get install texlive-extra-utils
$> sudo apt-get install texlive-latex-recommended
$> sudo apt-get install texlive-bibtex-extra
$> sudo apt-get install texlive-humanities
$> sudo apt-get install texlive-fonts-recommended
$> sudo apt-get install texlive-pstricks
$> sudo apt-get install texlive-science
$> sudo apt-get install texlive-fonts-extra-doc
$> sudo apt-get install texlive-latex-base-doc
$> sudo apt-get install texlive-doc-base
$> sudo apt-get install texlive-latex-recommended-doc
$> sudo apt-get install texlive-humanities-doc
$> sudo apt-get install texlive-pstricks-doc
$> sudo apt-get install texlive-science-doc
$> sudo apt-get install texlive-metapost-doc
$> sudo apt-get install texlive-pictures-doc
$> sudo apt-get install texlive-latex-extra-doc
$> sudo apt-get install texlive-publishers-doc
$> sudo apt-get install texlive-fonts-recommended-doc
$> sudo apt-get install texlive-doc-en
$> sudo apt-get install texlive-lang-danish
$> sudo apt-get install texlive-lang-ukenglish
$> sudo apt-get install texlive-lang-german
$> sudo apt-get install texlive-lang-french
$> sudo apt-get install texlive-lang-greek
$> sudo apt-get install feynmf
$> sudo apt-get install tex4ht
$> sudo apt-get install tex4ht-common
$> sudo apt-get install texinfo tex-common
$> sudo apt-get install libkpathsea5
$> sudo apt-get install libkpathsea-dev
$> sudo apt-get install pgf
$> sudo apt-get install dvipng
$> sudo apt-get install latex-xft-fonts
$> sudo apt-get install xfonts-mathml
$> sudo apt-get install musixtex
$> sudo apt-get install musixlyr
$> sudo apt-get install latex-sanskrit
$> sudo apt-get install latex-xcolor
$> sudo apt-get install lacheck ps2eps
$> sudo apt-get install latex-beamer
$> sudo apt-get install cm-super
$> sudo apt-get install cm-super-minimal
$> sudo apt-get install context
$> sudo apt-get install musixtex-slurps
$> sudo apt-get install preview-latex-style
$> sudo apt-get install prosper
$> sudo apt-get install tipa
$> sudo apt-get install lmodern
$> sudo apt-get install lcdf-typetools
Note that the above installs language packages for Danish, Greek, German and French (English is part of the standard distribution and is always installed).
Now you have a full working LaTeX distribution installed and you can compile your LaTeX document by running
$> pdflatex filename.tex
That is actually how simple it is. I recommend to use either gedit (part of Ubuntu installation) or Eclipse (can be installed using the Synaptics Package Manager or apt-get) to write LaTeX documents, but
you can use whichever plain text editor you prefer.
7. Install Graphviz (optionally)
8. Create makefile with complete scenario.
####################################################################
#
# This is makefile for doxygen documentation.
#
####################################################################
include ./rules
ifeq ($(HOST_OS),WIN)
all:
cd $(PROJECT_PATH)/doc; \
$(DOXYGEN_PATH)/doxygen Doxyfile > doxylog.log; \
cp $(PROJECT_PATH)/doc/conf/Makefile $(PROJECT_PATH)/doc/latex/Makefile; \
cp $(PROJECT_PATH)/doc/conf/pdflatex.input $(PROJECT_PATH)/doc/latex/pdflatex.input; \
cd $(PROJECT_PATH)/doc/latex; \
$(DOXYGEN_MAKE_PATH)/make; \
$(RM) refman.pdf; \
$(DOXYGEN_MAKE_PATH)/make; \
cp $(PROJECT_PATH)/doc/latex/refman.pdf $(PROJECT_PATH)/doc/$(DOCNAME).pdf
clean:
$(RM) $(PROJECT_PATH)/doc/html/*.*; \
$(RM) $(PROJECT_PATH)/doc/latex/*.*
endif
$(DOXYGEN_PATH)/doxygen is the path to the doxygen.exe file,
Doxyfile is the name of your doxy-configuration file,
doxylog.log is the output file to analyze warnings and errors,
pdflatex.input is the helpful file with an answer to all questions. Just letter r. This answer helps you avoid manually typing using a keyboard.
r
$(PROJECT_PATH)/doc/conf/Makefile is the additional makefile especially to create manual.pdf file
With the TexLive package the following Makefile will be autognerated
all: clean refman.dvi
ps: refman.ps
pdf: refman.pdf
ps_2on1: refman_2on1.ps
pdf_2on1: refman_2on1.pdf
refman.ps: refman.dvi
dvips -o refman.ps refman.dvi
refman.pdf: refman.ps
gswin32c -q -dNOPAUSE -dBATCH -sDEVICE=pdfwrite -sOutputFile=refman.pdf -c save pop -f refman.ps
refman.dvi: refman.tex doxygen.sty
echo "Running latex..."
latex refman.tex
echo "Running makeindex..."
makeindex refman.idx
echo "Rerunning latex...."
latex refman.tex
latex_count=5 ; \
while egrep -s 'Rerun (LaTeX|to get cross-references right)' refman.log && [ $$latex_count -gt 0 ] ;\
do \
echo "Rerunning latex...." ;\
latex refman.tex ;\
latex_count=`expr $$latex_count - 1` ;\
done
refman_2on1.ps: refman.ps
psnup -2 refman.ps >refman_2on1.ps
refman_2on1.pdf: refman_2on1.ps
gswin32c -q -dNOPAUSE -dBATCH -sDEVICE=pdfwrite -sOutputFile=refman_2on1.pdf -c save pop -f refman_2on1.ps
clean:
rm -f *.ps *.dvi *.aux *.toc *.idx *.ind *.ilg *.log *.out refman.pdf
and the last hint is using double building due to well known bug with page indexes
$(DOXYGEN_MAKE_PATH)/make; \
$(RM) manual.pdf; \
$(DOXYGEN_MAKE_PATH)/make; \
simply typing make doc in the root project's directory.
at the end of make all inside the latex sub folder you should see
(see the transcript file for additional information)
Output written on refman.dvi (1873 pages, 6754516 bytes).
Transcript written on refman.log.
Wednesday, November 06, 2013
Putting the (ultra-low) Power in GeoFence
Great article about ultra-low Power in GeoFence
http://gpsworld.com/putting-the-ultra-low-power-in-geofence/
GPS World Blog: Geofencing and Location Apps Shouldn’t Be a Battery Killer
http://blog.broadcom.com/smartphones/gps-world-blog-geofencing-and-location-apps-shouldnt-be-a-battery-killer/
http://gpsworld.com/putting-the-ultra-low-power-in-geofence/
GPS World Blog: Geofencing and Location Apps Shouldn’t Be a Battery Killer
http://blog.broadcom.com/smartphones/gps-world-blog-geofencing-and-location-apps-shouldnt-be-a-battery-killer/
Thursday, October 31, 2013
Google Nexus 5 Inside Out
• CPU: MSM8974A (Qualcomm) Possible that it can be using a 'higher binned' Snapdragon 800
• Radio Chip: Qualcomm MDM9x25 + RF360 support <-- well-made video, deals with LTE band fragmentation (max thorough-put
150mbps, carrier aggregation/MIMO, LTE-A ready)
• LTE Chip: WTR1605L (Qualcomm) (7-band world LTE chip. Found in the Nexus 4 and iPhone 5s) List of Supported Bands for LG-D820, NA model Here is another list from Anandtech
• LG-D820 (North American Model): LTE bands 2/4/5/17/25/26/41
• LG-D821 (International Model): LTE bands 1/3/5/7/8/20/41
• Handy list of LTE networks
• Motion Co-Processor: MPU-6515 (Invensense) (6-axis gyro + accelerometer, MEMS motion tracking. Low voltage compared to it's comparables; 1.7v minimum) (afaik the N5 will be the first to have
this new low powered chip)
"The MPU-6500 MotionTracking device sets a new benchmark for 6-axis performance with nearly 60% lower power, a 45% smaller package, industry-leading consumer gyroscope performance, and major
improvements in accelerometer noise, bias, and sensitivity."
• Power Management Controller: PM8941/PM8841 (Qualcomm) (PM8941 Found in the LG G2, Nexus 7 (2013), and Note 3)
• WiFi/BT: BCM4339 (Broadcom) (5Ghz WiFi + 802.11ac) PA + LNA front end support
• Audio Codec: WCD9320 (Qualcomm) '24bit x 192kHz FLAC/WAV' (found in the LG G2, among other phones like the Note 3)
• Power controller for Display: DW8755 (Dongwoon Anatech) Lower powered than it's predecessors
• LED Backlight: LM3630A (Texas Instruments)
• Compass Sensor: AK8963C (Asahi Kasei Microdevices) (this component looks to be brand new. Datasheet is time-stamped for October 2013)
• Barometer Sensor: BMP280 (Bosch SensorTec) (Datasheet here)
• Enhancement of GPS navigation (e.g. time-to-first-fix improvement, dead-reckoning, slope detection)
• Indoor navigation (floor detection, elevator detection)
• Outdoor navigation, leisure and sports applications
• Weather forecast
• Health care applications (e.g. spirometry)
• Vertical velocity indication (e.g. rise/sink speed)
• Ambient/Proximity Sensor: APDS-9930 (Avago)
• NFC Chip: BCM20793M (Broadcom) (This chip is not compatible with Google Wallet as it does not have embedded hardware security element. Same with the Nexus 7 refresh)
• Envelope Tracking feature: [QFE1100] (Qualcomm)
• ACPM-7600: (Avago) (This is related to power management and is currently found in the Note 3) This chip has to do with envelope tracking and carrier aggregation
• Slimport Transmitter: ANX7808 (Analogix)
• USB host, device or OTG data passes through by default
• Meets requirements of Inter-Chip USB specification
• HDMI 1.4a compliant (Stereo 3D video output support)
Android 4.3 init.rc
init is the first process after kernel started. For Android 4.3, the corresponding source code lies in: system/core/init
https://android.googlesource.com/platform/system/core/+/9a4913d422f4c18033333afe8e2e1d699b112d44/init/
It does the following tasks step by step:
Initialize log system.
Parse /init.rc and /init.%hardware%.rc.
Execute early-init action in the two files parsed in step 2.
Device specific initialize. For example, make all device node in /dev and download firmwares.
Initialize property system. Actually the property system is working as a share memory. Logically it looks like a registry under Windows system.
Execute init action in the two files parsed in step 2.
Start property service.
Execute early-boot and boot actions in the two files parsed in step 2.
Execute property action in the two files parsed in step 2.
Enter into an indefinite loop to wait for device/property set/child process exit events. For example, if an SD card is plugged in, init will receive a device add event, so it can make node for the
device. Most of the important process is forked in init, so if any of them crashed, init will receive a SIGCHLD then translate it into a child process exit event, so in the loop init can handle the
process exit event and execute the commands defined in *.rc (it will run command onrestart).
The .rc file is a script file defined by Android. The default is device/system/rootdir/init.rc. We can take a loot at the file format(system/core/init/readme.txt is a good overall introduction of the
script). Basically the script file contains actions and services.
Wednesday, October 30, 2013
Finding Apache configuration file (httpd.conf)
Finding Apache configuration file (httpd.conf)
Just a quick tip for programmers working with Apache. Sometimes I'm asked where to find the Apache configuration file on a given server. Since it's possible to configure this there is no "default location" so I usually do:
$ ps -ef | grep apache
which gives me a list like
deploy@cmd01:/$ ps -ef | grep apache
root 4053 1 0 06:26 ? 00:00:04 /usr/sbin/apache2 -k start
www 5189 4053 0 11:00 ? 00:00:00 /usr/sbin/apache2 -k start
www 5199 4053 0 11:00 ? 00:00:00 /usr/sbin/apache2 -k start
...
Then simply run
$ /usr/sbin/apache2 -V
and you will get the details you need, specifically this
Server compiled with....
-D SERVER_CONFIG_FILE="/etc/apache2/apache2.conf"
Wednesday, September 11, 2013
Linux / UNIX: Change File Permissions Recursively with or without condition
To change file access permissions you need to use the chmod command.
It has -R or --recursive option that change files and directories recursively. The find command can be used to find files and directories.
The chown command can be used to change user and group permission
chown command
chown command changes the user and/or group ownership of for given file. The syntax is:
chown owner-user file
chown owner-user:owner-group file
chown owner-user:owner-group directory
chown options owner-user:owner-group file
Examples
First, list permissions for demo.txt, enter:
# ls -l demo.txt
Sample outputs:
-rw-r--r-- 1 root root 0 Aug 31 05:48 demo.txt
In this example change file ownership to thomas user and list the permissions, run:
# chown thomas demo.txt
# ls -l demo.txt
Sample outputs:
-rw-r--r-- 1 thomas root 0 Aug 31 05:48 demo.txt
In this next example, the owner is set to thomas followed by a colon and a group onwership is also set to thomas group, run:
# chown thomas:thomas demo.txt
# ls -l demo.txt
Sample outputs:
-rw-r--r-- 1 thomas thomas 0 Aug 31 05:48 demo.txt
In this example, change only the group of file. To do so, the colon and following GROUP-name ftp are given, but the owner is omitted, only the group of the files is changed:
# chown :ftp demo.txt
# ls -l demo.txt
Sample outputs:
-rw-r--r-- 1 thomas ftp 0 Aug 31 05:48 demo.txt
Please note that if only a colon is given, or if NEW-OWNER is empty, neither the owner nor the group is changed:
# chown : demo.txt
In this example, change the owner of /foo to "root", execute:
# chown root /foo
Likewise, but also change its group to "httpd", enter:
# chown root:httpd /foo
Change the owner of /foo and subfiles to "root", run:
# chown -R root /u
Where,
-R - Recursively change ownership of directories and their contents.
However, if you need to apply conditional file permissions recursively, you need to use combination of the find and chmod command. To find all files in /home/user/demo directory, enter:
$ find /home/user/demo -type f -print
To find all files in /home/user/demo directory with permission 777, enter:
$ find /home/user/demo -type f -perm 777 -print
Finally, apply new permission using the -exec option as follows:
$ find /home/user/demo -type f -perm 777 -print -exec chmod 755 {} \;
To select directories and sub directories use the following syntax:
$ find /var/www/html -type d -perm 777 -print -exec chmod 755 {} \;
Sample Shell Script To Change Permission Recursively
#!/bin/bash
# Purpose: Set correct webserver files and dir permissions
# This script is released under GPL version 2.0 or above
# Set root permission as follows for the Apache / Lighttpd / Nginx DocumentRoot
# + Dirs/Subdirs: read-only and execute to others
# + Files: read-only permission
# Tested on Debian Linux v3/4/5/6 and RHEL v2/3/4/5/6
# -------------------------------------------------------------------------------------------------
_dir="${1:-.}"
_fperm="0444"
_dperm="0445"
_ugperm="root:root"
_chmod="/bin/chmod"
_chown="/bin/chown"
_find="/usr/bin/find"
_xargs="/usr/bin/xargs"
echo "I will change the file permission for webserver dir and files to restrctive read-only mode for \"$_dir\""
read -p "Your current dir is ${PWD}. Are you sure (y / n) ?" ans
if [ "$ans" == "y" ]
then
echo "Changing file onwership to $_ugperm for $_dir..."
$_chown -R "${_ugperm}" "$_dir"
echo "Setting $_fperm permission for $_dir directory...."
$_chmod -R "${_fperm}" "$_dir"
echo "Setting $_dperm permission for $_dir directory...."
$_find "$_dir" -type d -print0 | $_xargs -0 -I {} $_chmod $_dperm {}
fi
You can run this script as follows:
./script /var/www/html/
./script /usr/lib/cgi-bin/
Monday, June 17, 2013
Extract useful data from iPhone 4 including Shazham tags list, wallpaper images such as lock screen background or home background
1 Install SQLite Database Browser in your Applications Folders
Click here to download
2 Install iPhone Backup Extractor
Click here for download
3 Download iTunes 11.0.4.4
4 backup your phone with iTunes
5 Launch iPhone Backup Extractor
5.1 Select Expert mode
5.2 For Shazam
5.2.1 Check the file com.shazam.Shazam/Documents/ShazamDataModel.sqlite
5.2.2 Choose File/Export, choose Export only checked file(s) ShazamDataModel.sqlite
5.2.3 Save the ShazamDataModel.sqlite file
5.2.4 Open the file with SQLite Database Browser and export the list to your favorites format
5.3 For lock Screen
5.3.1 The wallpaper is actually stored under the Springboard folder in the "Library". So, extract the file called HomeBackground.cpbitmap
or LockBackground.cpbitmap
5.3.2 Open your browser at http://cpbitmap.cleverbyte.com.au/
5.3.3 Select the output format PNG or JPG (loosy compression)
5.3.4 Upload the cpbitmap and enjoy your converted file
5.3.5 Scale the image to fit new iPhone 5 screen size using Photoshop/Gimp
5.3.6 Send the new file to your new iPhone 5 and update the lock screen
Note:You can also build the CPBitmap yourself using Visual Studio 2010 but you might have to change the code from time to time
if any changes to the cpbitmap has occured. The source code of the project is available here
Monday, June 03, 2013
Getting Public Key Token of Assembly Within Visual Studio
This is a very common Assembly.Load failure exception text. The terminology, this is called Ref-Def-Mismatch. This exception is thrown when your project finds an assembly that does not match what you
are looking for. A very common mismatch is version number. An example is, you asks for version 1.0.0.0, but version 2.0.0.0 is found. (keep in mind that for simply named assemblies, version
number is ignored. So we are really talking about strongly named assemblies here.)
The only time this exception will be thrown is when the mismatched assembly is in your appbase. Visual Studio will probe GAC first. If the assembly is not found in GAC, then it will probe your
appbase. If an assembly is found that matches the simple name, but has mismatch on other part of the assembly name, this exception will be thrown. Say you call
Assembly.Load(”MyAsm,Version=1.0.0.0,Culture=Neutral,PublicKeyToken=0123456789abcdef”, and VisualStudio finds MyAsm.dll in your appbase, but its version is 2.0.0.0, an exception will be thrown at
compilation time.
Regarding binding design decision.
Another interesting observation on this is for dependencies of LoadFrom assemblies. For dependencies of LoadFrom assemblies, we will probe the appbase, then the parent assembly's directory. If a
mismatch assembly is found in appbase, it does not mean a matching assembly won't be found in parent assembly's directory.
To solve this you can force specific version using Strongly named assembly. You must sign the assembly during the build step then reference your project with an assembly already build
in the target folder and then you can edit the project and force a specific assembly version using the PublicKeyToken attribute.
To generate the PublicKeyToken
In Visual Studio, go to the Tools menu and choose External Tools.

That brings up a new dialog window.
Click the Add button and add the following:
Title: Get &PublicKeyToken
Command: C:\Program Files\Microsoft SDKs\Windows\v8.0A\bin\NETFX 4.0 Tools\sn.exe
Arguments: -Tp $(TargetPath)
Check the Use Output Window checkbox. The final looks like this:
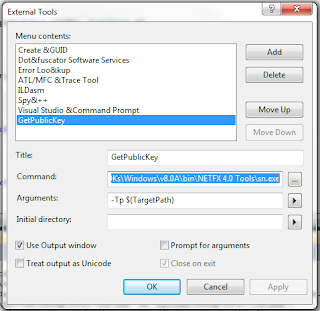
Create a project and sign it using a strong name key. Then choose Tools / Get PublicKeyToken, and in the output window you will see something like the following:
Microsoft (R) .NET Framework Strong Name Utility Version 3.5.21022.8
Copyright (c) Microsoft Corporation. All rights reserved.
Public key is
0024000004800000940000000602000000240000525341310004000001000100d59451ff2ed310
447372c4d689f24dcece5aaaef6dddaffc3e43c36a9235586b33ec9e3121ad844ee521bd76fbc0
9a9a357bfeec32d87d8cd1278cd7697667263724e6ff1712e5ee3054542cfbb11b9241da118fbd
c1df7439ba13db77b63f8bf557c7f081946c02e32884c82806e0e95667e879d15b9a2912012398
76e0efa7
Public key token is 9589fa1be527eb6c
You can use the Public Key to force the dependency with a specific assembly.
This is useful for design time assembly or to differentiate assembly limited
in feature with full featured assembly
Wednesday, May 01, 2013
Older developer are better than young developer :)
http://www.wired.com/wiredenterprise/2013/04/developers-age/
Older software programmers have long complained of age discrimination. But according to study conducted by researchers at North Carolina State University, companies should think twice before hiring a young hot-shot hacker over a seasoned developer.
Emerson Murphy-Hill, an assistant professor of computer science at North Carolina State University and co-author of the study, says that veteran developers have more going for them than you might think. “We know certain things get worse, like your eye sight,” he says. “But it’s not all bad. You get better at some things, such as social and emotional intelligence.”
He says that we tend to think of programming as something that’s only practiced by the young: you spend your 20s working 80 hours a week, and then you give it up and go into management. But that may not be the best way to play it.
To determine whether programmers get better or worse with age, the researchers looked at the top ranked programmers on StackOverflow, a site where coders can ask and answer questions about programming. Users rate answers from fellow developers, and then the site uses those rating to generate a reputation score for each developer. Comparing these reputation scores to the age of each developer, the researchers found that these ratings tended to increase as developers moved into their 50s.
The study also they tried to rate the breadth of each developer’s knowledge by tracking how many different subjects they had written about. The researchers found that younger developers replied to questions in a smaller number of subject areas, and that the range of subjects broadened as developers got older.
Finally, the study looked at how many questions developers answered about technologies less than 10 years old, and it found that older developers were more knowledgable than younger users about newer mobile platforms such as iOS and Windows Phone. For other technologies, there were was no significant gap between younger and older users.
The researchers concluded that any bias against older developers is unsupported by the data on StackOverflow. But the study has its limits. Many StackOverflow users don’t report their age, and it appears that older programmers are under represented on StackOverflow, based on data from the Bureau of Labor Statistics.
Older programmers who use the site may making a conscious effort to keep their technologies skills current and to promote themselves. Or they may use the site because they know they are knowledgeable, while their less knowledgeable peers may stay off the site, skewing the results. And, of course, StackOverflow reputation scores don’t necessarily correlate to programming skills.
The paper detailing the study, Is Programming Knowledge Related To Age?, will be presented at the Working Conference on Mining Software Repositories in San Francisco on May 18. But it’s just a start. In an effort to draw better conclusions, Murphy-Hill says his team hopes to look at a wider variety of programmer populations. He says they’re also interested in finding out why younger developers contribute more to open source than older developers.
Wednesday, March 27, 2013
Nokia 920 vs Samsung Galaxy SIII picture quality
Very cool photo comparison tool
Welcome to the GSMArena Photo Compare Tool. The tool puts up to three phones and their cameras head to head, testing their performance on three charts.
The overview picture on the left shows each chart through the "eyes" of the phone and the windows on the right show a part of the photo zoomed at 100%. You can drag the green viewfinder (or just click on the overview) to pan around the chart.
http://www.gsmarena.com/piccmp.php3?idType=3&idPhone1=4967&idPhone2=4968&idPhone3=4238
Thursday, March 14, 2013
How can I pad an int32 or int64 with leading zeros replacement of sprintf
#define hexchar(x) ((((x)&0x0F)>9)?((x)+'A'-10):((x)+'0'))
typedef signed long long Int64;
// special printf for numbers only
// see formatting information below
// Print the number "n" in the given "base"
// using exactly "numDigits"
// print +/- if signed flag "isSigned" is TRUE
// use the character specified in "padchar" to pad extra characters
//
// Examples:
// sprintfNum(pszBuffer, 6, 10, 6, TRUE, ' ', 1234); --> " +1234"
// sprintfNum(pszBuffer, 6, 10, 6, FALSE, '0', 1234); --> "001234"
// sprintfNum(pszBuffer, 6, 16, 6, FALSE, '.', 0x5AA5); --> "..5AA5"
void sprintfNum(char *pszBuffer, int size, char base, char numDigits, char isSigned, char padchar, Int64 n)
{
char *ptr = pszBuffer;
if (!pszBuffer)
{
return;
}
char *p, buf[32];
unsigned long long x;
unsigned char count;
// prepare negative number
if( isSigned && (n < 0) )
{
x = -n;
}
else
{
x = n;
}
// setup little string buffer
count = (numDigits-1)-(isSigned?1:0);
p = buf + sizeof (buf);
*--p = '\0';
// force calculation of first digit
// (to prevent zero from not printing at all!!!)
*--p = (char)hexchar(x%base);
x = x / base;
// calculate remaining digits
while(count--)
{
if(x != 0)
{
// calculate next digit
*--p = (char)hexchar(x%base);
x /= base;
}
else
{
// no more digits left, pad out to desired length
*--p = padchar;
}
}
// apply signed notation if requested
if( isSigned )
{
if(n < 0)
{
*--p = '-';
}
else if(n > 0)
{
*--p = '+';
}
else
{
*--p = ' ';
}
}
// print the string right-justified
count = numDigits;
while(count--)
{
*ptr++ = *p++;
}
return;
}
Monday, March 11, 2013
ERROR LEVEL
Errorlevels
The correct name for errorlevels would be return codes.
But since the DOS command to determine the return code is IF ERRORLEVEL, most people use the name errorlevel.
Errorlevels are not a standard feature of every command.
A certain errorlevel may mean anything the programmer wanted it to.
Most programmers agree that an errorlevel 0 means the command executed successfully, and an errorlevel 1 or higher usually spells trouble.
But there are many exceptions to this general rule.
IF ERRORLEVEL construction has one strange feature, that can be used to our advantage: it returns TRUE if the return code was equal to or higher than the specified errorlevel.
This means most of the time we only need to check IF ERRORLEVEL 1 ... and this will return TRUE for every non-zero return code.
In Windows NT 4/2000/XP this may sometimes fail, since some executables return negative numbers for errorlevels!
However, this can be fixed by using the following code to check for non-zero return codes:
IF %ERRORLEVEL% NEQ 0 ...
Use the code above wherever you would have used IF ERRORLEVEL 1 ... in the "past".
To determine the exact return code the previous command returned, we could use a construction like this:
@ECHO OFF
IF ERRORLEVEL 1 SET ERRORLEV=1
IF ERRORLEVEL 2 SET ERRORLEV=2
IF ERRORLEVEL 3 SET ERRORLEV=3
IF ERRORLEVEL 4 SET ERRORLEV=4
•
•
•
IF ERRORLEVEL 254 SET ERRORLEV=254
IF ERRORLEVEL 255 SET ERRORLEV=255
ECHO ERRORLEVEL = %ERRORLEV%
This is perfectly OK if we only have to check, say, 15 consecutive errorlevels.
If we need to check every errorlevel, though, there are better alternatives.
In Windows NT 4 (and 2000?) this won't work, since the SET command itself will set an errorlevel (usually 0)!
(As I learned from Charles Long, in XP the SET command no longer sets an errorlevel itself.)
However, Windows NT 4 and later make it easy by storing the latest errorlevel in the environment variable ERRORLEVEL:
ECHO.%ERRORLEVEL%
will display the errorlevel.
This blog entry by Batcheero explains perfectly why you should never SET the ERRORLEVEL variable.
The safest way to use errorlevels for all DOS versions is the reverse order check.
Start checking the highest errorlevel that can be expected, then check for the one below, etcetera:
IF ERRORLEVEL 255 GOTO Label255
IF ERRORLEVEL 254 GOTO Label254
•
•
•
IF ERRORLEVEL 2 GOTO Label2
IF ERRORLEVEL 1 GOTO Label1
GOTO Label0
:Label255
(commands to be executed at errorlevel 255)
GOTO End
•
•
•
:Label1
(commands to be executed at errorlevel 1)
GOTO End
:Label0
(commands to be executed at errorlevel 0, or no errorlevel)
:End
This will result in many more lines of batch code, but at least it will work in any DOS version.
In DOS for the rest of us, we can use FOR loops to determine the errorlevel:
@ECHO OFF
REM Reset variables
FOR %%A IN (1 10 100) DO SET ERR%%A=
REM Check error level hundredfolds
FOR %%A IN (0 1 2) DO IF ERRORLEVEL %%A00 SET ERR100=%%A
IF %ERR100%==2 GOTO 200
IF %ERR100%==0 IF NOT "%1"=="/0" SET ERR100=
REM Check error level tenfolds
FOR %%A IN (0 1 2 3 4 5 6 7 8 9) DO IF ERRORLEVEL %ERR100%%%A0 SET ERR10=%%A
IF "%ERR100%"=="" IF %ERR10%==0 SET ERR10=
:1
REM Check error level units
FOR %%A IN (0 1 2 3 4 5) DO IF ERRORLEVEL %ERR100%%ERR10%%%A SET ERR1=%%A
REM Modification necessary for errorlevels 250+
IF NOT ERRORLEVEL 250 FOR %%A IN (6 7 8 9) DO IF ERRORLEVEL %ERR100%%ERR10%%%A SET ERR1=%%A
GOTO End
:200
REM In case of error levels over 200 both
REM tenfolds and units are limited to 5
REM since the highest DOS error level is 255
FOR %%A IN (0 1 2 3 4 5) DO IF ERRORLEVEL 2%%A0 SET ERR10=%%A
IF ERR10==5 FOR %%A IN (0 1 2 3 4 5) DO IF ERRORLEVEL 25%%A SET ERR1=%%A
IF NOT ERR10==5 GOTO 1
:End
REM Clean up the mess and show results
SET ERRORLEV=%ERR100%%ERR10%%ERR1%
FOR %%A IN (1 10 100) DO SET ERR%%A=
ECHO ERRORLEVEL %ERRORLEV%
Thursday, February 28, 2013
WIX CustomAction deferred versus immediate and the nightmare of Windows platform dotNet dependency
When it comes to using WIX everybody would agree that C# language is on the paper the easiest language to use to write a Custom Action.
When things get more complicated is that if you want to create a WIX installer for both Windows 7 and Windows8 then you need to
build each custom action to target both dotNet Framework 3.5 and dotNetFramework 4.0 unfortunately you will have to create two solution because
unlike Visual Studio C++ project the dotNet dependency applies to the entire solution and not the configuration at least this is what I noticed
on Visual Studio 2010.
You have to be very careful on when to decide that your CustomAction will be immediate and when it will be deferred.
If you use your custom action to install driver, install Windows Services, setup MYSQL ODBC connection, configure IIS or delete file from protected folder
then you need to use a deferred custom action.
While both deferred and immediate custom actions can run in the context of the user initiating the installation, only deferred custom actions can run elevated using the system context.
Deferred custom actions can only be sequenced between the InstallInitialize and InstallFinalize actions in execute sequence tables. Immediate custom actions, on the other hand, can be sequenced
anywhere within any of the sequence tables. Deferred custom actions are not executed immediately. Instead they are scheduled to run later during the execution script. The execution script isn't processed until the InstallExecute, InstallExecuteAgain, or InstallFinalize action is run.
Deferred custom actions cannot access the installation database. In fact, deferred custom actions have very limited access to the installation session because an installation script can be executed
outside of the installation session that created it. Immediate custom actions have access to the installation database and can read and set installation properties, modify feature and component
states, and add temporary columns, rows, and tables among other things.
Deferred custom actions should be used when the custom action must make a change to the system or call another system service. Additionally, only deferred custom actions can run in an elevated
context. If your custom action requires elevated privileges in order to run, your custom action needs to be marked as deferred. Custom actions marked to run in the system context
(msidbCustomActionTypeInScript + msidbCustomActionTypeNoImpersonate) will only run in the system context if the installation itself is elevated.
So let's look at how to solve the dependencencie issue first.
1 I recommend passing an argument to your WIX build script to create an MSI based on the targeted OS
2 Dot Net Dependency
Make sure you know the build in version of dotNet on your targeted OS Win7 is 3.5 with fallback to 2.0
Windows 8 is 4.0 and deprecated support for 3.5
3 CustomAction deferred

Inside your C# CustomAction you can only access property passed to you inside the Value attribute of the CustomAction
session.Message(InstallMessage.Warning,
new Record(new string[]
{
string.Format("MYVARIABLE: {0}",
session.CustomActionData["MYVARIABLE"])
}));
Direct access to the property will fail such as string UILevel = session["UILevel"];
You cannot change MSI property inside the CustomAction but you can cheat and log a dummy property if you expect to parse the installation log during a silent install
to check the response of your custom action. Rolling back custom action is not easy when you messed up with some third party application setting
so in some cases you have to return return ActionResult.Success regardless of the outcome and rely on a result code
EG
string strLog = string.Format("Property(S): ResultCode = {0}", Convert.ToString(1));
session.Log(strLog);
4 CustomAction immediate
For install custom action if your custom action rely on files deployed within your MIS to some target folder then make sure you change Before="InstallFinalize" to
After="InstallFinalize">
In this case you can access any property through the session object EG string UILevel = session["UILevel"]; and you can set a new property before exiting from your CustomAction
session["ResultCode"] = 1
Hope this article will help you solve Windows 7 and Windows 8 Installer issue
When things get more complicated is that if you want to create a WIX installer for both Windows 7 and Windows8 then you need to
build each custom action to target both dotNet Framework 3.5 and dotNetFramework 4.0 unfortunately you will have to create two solution because
unlike Visual Studio C++ project the dotNet dependency applies to the entire solution and not the configuration at least this is what I noticed
on Visual Studio 2010.
You have to be very careful on when to decide that your CustomAction will be immediate and when it will be deferred.
If you use your custom action to install driver, install Windows Services, setup MYSQL ODBC connection, configure IIS or delete file from protected folder
then you need to use a deferred custom action.
While both deferred and immediate custom actions can run in the context of the user initiating the installation, only deferred custom actions can run elevated using the system context.
Deferred custom actions can only be sequenced between the InstallInitialize and InstallFinalize actions in execute sequence tables. Immediate custom actions, on the other hand, can be sequenced
anywhere within any of the sequence tables. Deferred custom actions are not executed immediately. Instead they are scheduled to run later during the execution script. The execution script isn't processed until the InstallExecute, InstallExecuteAgain, or InstallFinalize action is run.
Deferred custom actions cannot access the installation database. In fact, deferred custom actions have very limited access to the installation session because an installation script can be executed
outside of the installation session that created it. Immediate custom actions have access to the installation database and can read and set installation properties, modify feature and component
states, and add temporary columns, rows, and tables among other things.
Deferred custom actions should be used when the custom action must make a change to the system or call another system service. Additionally, only deferred custom actions can run in an elevated
context. If your custom action requires elevated privileges in order to run, your custom action needs to be marked as deferred. Custom actions marked to run in the system context
(msidbCustomActionTypeInScript + msidbCustomActionTypeNoImpersonate) will only run in the system context if the installation itself is elevated.
So let's look at how to solve the dependencencie issue first.
1 I recommend passing an argument to your WIX build script to create an MSI based on the targeted OS

2 Dot Net Dependency
Make sure you know the build in version of dotNet on your targeted OS Win7 is 3.5 with fallback to 2.0
Windows 8 is 4.0 and deprecated support for 3.5

3 CustomAction deferred

Inside your C# CustomAction you can only access property passed to you inside the Value attribute of the CustomAction
session.Message(InstallMessage.Warning,
new Record(new string[]
{
string.Format("MYVARIABLE: {0}",
session.CustomActionData["MYVARIABLE"])
}));
Direct access to the property will fail such as string UILevel = session["UILevel"];
You cannot change MSI property inside the CustomAction but you can cheat and log a dummy property if you expect to parse the installation log during a silent install
to check the response of your custom action. Rolling back custom action is not easy when you messed up with some third party application setting
so in some cases you have to return return ActionResult.Success regardless of the outcome and rely on a result code
EG
string strLog = string.Format("Property(S): ResultCode = {0}", Convert.ToString(1));
session.Log(strLog);
4 CustomAction immediate
For install custom action if your custom action rely on files deployed within your MIS to some target folder then make sure you change Before="InstallFinalize" to
After="InstallFinalize">

In this case you can access any property through the session object EG string UILevel = session["UILevel"]; and you can set a new property before exiting from your CustomAction
session["ResultCode"] = 1
Hope this article will help you solve Windows 7 and Windows 8 Installer issue
Monday, February 18, 2013
Friday, February 15, 2013
Very interesting article about Adobe Photoshop source code version 1
pho·to·shop, transitive verb, often capitalized \ˈfō-(ˌ)tō-ˌshäp\
1.to alter (a digital image) with Photoshop software or other image-editing software especially in a way that distorts reality (as for deliberately deceptive purposes)
– Merriam-Webster online dictionary, 2012
http://computerhistory.org/atchm/adobe-photoshop-source-code/
Thursday, February 14, 2013
Fast way to shrink VMWARE image
I am sure everyone noticed that when using a repository inside the VM the size of the VM on disk
keeps growing even when you delete branches or get rid of old Android repo like 2.3 and focus on the good
stuff Android 4.2 and work against the fragmentation of Google Android Platform where migration is key :)
To get more disk space, the key is to compact the VM once in a while.
The slow way
Normal commands for Linux VM are
1. Inside of VM-- $ sudo vmware-tools
a. Select “shrink” tab
b. Select “/” folder
c. Hit “shrink” button and enjoy the process
d. Repeat the same for “/boot” folder and for any other folders you might have there
2. Shutdown VM completely
3. From VMware menu find “Settings->Hardware->Hard Disk->Utilities->Defragment”
4. From VMware menu find “Settings->Hardware->Hard Disk->Utilities->Compact”
Now the fast way :
For Linux VM
In the VM, in a Terminal make sure you become root (sudo bash) and then copy and paste the following command, as is,
and then press Enter:
dd if=/dev/zero of=wipefile bs=1024x1024; rm wipefile
Wait for the command prompt to return and then shutdown the VM and then from the Virtual Machine Settings for the
Hard Disk select the Compact command from the Utilities button.
You’ll be able to spare a couple of Gigabyte !!
We are talking at least of a 2X gain easy.. I didn't benchmark yet because I am impatient to use the fast way only!
On Windows
Assuming the VMware virtual disk is not pre-allocated and the Filesystem is ext4 you will have to
manually prepare it to be shrunk. When Windows deletes a file, it doesn’t actually delete the data on the disk,
it just deletes the references/pointers in the file allocation tables. So when “shrink” is processing a vmdk and
is looking at the raw disk, it is seeing values that aren’t empty (non-zero) and export them as such.
So before doing a Shrink, use a really cool command line tool developed by Mark Russinovich SDelete.
Simply execute SDelete with parameter –c inside running Virtual Machine, then shut down the Guest
and do a Shrink
Wednesday, February 13, 2013
Installing Microsoft Update Standalone Packages Silently
MSU file extention are used to install Microsoft KB Hot Fixes. This process usually
display a dialog box similar to the Windows Update install dialog when installing
and at the end sometimes a reboot is needed.
As they use the same switches as the existing Microsoft updates,
installing them silently is very straightforward.
They are processed by a command named WUSA.EXE (Windows Update Standalone Installer),
so a command-line would look like this:
START /WAIT WUSA Windows6.0-KBNNNNNN-x86.msu /QUIET /NORESTART
Where 6.0 is the OS version
or
START /WAIT Windows6.0-KBNNNNNN-x86.msu /QUIET /NORESTART
You can run the WUSA command with /? to see a dialog box detailing the complete
help text:
wusa
wusa [/quiet] [/norestart]
/?, /h, /help – Display help information.
update – Full path of the MSU file.
/quiet – Quiet mode, no user interaction. reboot as needed
/norestart – When combined with /quiet, installer will NOT initiate reboot.
It is ignored if it is used alone
The following PowrShell Script will push a HOT FIX to a list of SERVERS
$Servers = $(1..176 | foreach {"SERVER$_"})
$HotfixPath = '\\Fileserver\Hotfixes\KB2464876\Windows6.0-KB2464876-x86.msu'
foreach ($Server in $Servers){
if (Test-Path "\\$Server\c$\Temp"){
Write-Host "Processing $Server..."
# Copy update package to local folder on server
Copy-Item $Hotfixpath "\\$Server\c$\Temp"
# Run command as SYSTEM via PsExec (-s switch)
& E:\SysinternalsSuite\PsExec -s \\$Server wusa C:\Temp\Windows6.0-KB2464876-x86.msu /quiet /norestart
if ($LastExitCode -eq 3010) {
$ConfirmReboot = $False
} else {
$ConfirmReboot = $True
}
# Delete local copy of update package
Remove-Item "\\$Server\c$\Temp\Windows6.0-KB2464876-x86.msu"
Write-Host "Restarting $Server..."
Restart-Computer -ComputerName $Server -Force -Confirm:$ConfirmReboot
Write-Host
} else {
Write-Host "Folder C:\Temp does not exist on the target server"
}
}
display a dialog box similar to the Windows Update install dialog when installing
and at the end sometimes a reboot is needed.
As they use the same switches as the existing Microsoft updates,
installing them silently is very straightforward.
They are processed by a command named WUSA.EXE (Windows Update Standalone Installer),
so a command-line would look like this:
START /WAIT WUSA Windows6.0-KBNNNNNN-x86.msu /QUIET /NORESTART
Where 6.0 is the OS version
or
START /WAIT Windows6.0-KBNNNNNN-x86.msu /QUIET /NORESTART
You can run the WUSA command with /? to see a dialog box detailing the complete
help text:
wusa
wusa
/?, /h, /help – Display help information.
update – Full path of the MSU file.
/quiet – Quiet mode, no user interaction. reboot as needed
/norestart – When combined with /quiet, installer will NOT initiate reboot.
It is ignored if it is used alone
The following PowrShell Script will push a HOT FIX to a list of SERVERS
$Servers = $(1..176 | foreach {"SERVER$_"})
$HotfixPath = '\\Fileserver\Hotfixes\KB2464876\Windows6.0-KB2464876-x86.msu'
foreach ($Server in $Servers){
if (Test-Path "\\$Server\c$\Temp"){
Write-Host "Processing $Server..."
# Copy update package to local folder on server
Copy-Item $Hotfixpath "\\$Server\c$\Temp"
# Run command as SYSTEM via PsExec (-s switch)
& E:\SysinternalsSuite\PsExec -s \\$Server wusa C:\Temp\Windows6.0-KB2464876-x86.msu /quiet /norestart
if ($LastExitCode -eq 3010) {
$ConfirmReboot = $False
} else {
$ConfirmReboot = $True
}
# Delete local copy of update package
Remove-Item "\\$Server\c$\Temp\Windows6.0-KB2464876-x86.msu"
Write-Host "Restarting $Server..."
Restart-Computer -ComputerName $Server -Force -Confirm:$ConfirmReboot
Write-Host
} else {
Write-Host "Folder C:\Temp does not exist on the target server"
}
}
Tuesday, February 12, 2013
Which operating systems come with .net ?
.NET Framework 1.1: Windows Server 2003
.NET Framework 2.0: Windows Server 2003 R2
.NET Framework 3.0: Windows Vista, Windows Server 2008
.NET Framework 3.5 SP1: Windows 7, Windows Server 2008 R2
.NET Framework 4.0: Windows 8
.NET Framework 4.5: Windows 8
.NET Compact Framework 1.0 (SP2): Windows Mobile 5.0
.NET Compact Framework 2.0: Windows Mobile 6.0
Mono 1.1.13.6: Ubuntu Dapper (6.06 LTS)
Mono 1.2.6: Ubuntu Hardy (8.04 LTS)
Mono 2.4.2.3: Ubuntu Karmic (9.10)
Mono 2.4 branch snapshot: Ubuntu Lucid (10.04 LTS)
Mono 2.6.7: Ubuntu Maverick (10.10), Ubuntu Natty (11.04)
Saturday, January 26, 2013
Lens correction for GoPro HD 3 Silver Edition using DXO Optics Pro 7 and greater
This tutorial explain how to flattened an image taken by the GoPro HD 3 using DXO Optics Pro.
DXO Optics pro is the best software out there to provide lens correction.
Unfortunately DXO Labs didn't release yet and official Correction Module for GoPro HD 3 Silver Edition
Nether the less you can still use fish eye correction in a few click to correct your image.
I will be using the following image taken in panoramic mode

Step 1 Load the image inside DXO Optics Pro

Step 2 let's take a closer look at the image properties
Menu Image --> Image properties

Step 3 on the right en size menu under the corrections group

Select the combo box Correction to Manual
Select the combo box Distortion type to Fish Eye
Finally move the intensity slider to + 67
Et voila!

Note that the result is not perfect and that some objects might still look a bit stretched
more particularly, the objects on the first plan but for outdoor shots this is not
that bad at all!
Now DXO Labs and GoPro folks, let's provide a lens module for DXO. Many are looking forward to it!
Subscribe to:
Posts (Atom)