This tutorial will show you step-by-step how to install:
Apache 2
PHP 5
MySQL 5
phpMyAdmin on Windows
For those who want to install an all in one solution on Windows I recommend
WampServer
http://www.wampserver.com/en/
The WampServer package is usually delivered with the latest
releases of Apache, MySQL and PHP.
Once WampServer is installed, you can add other releases by downloading them on this
website. They will then appear in the WampServer menu and you will be able to
switch releases with a simple click.
Each release of Apache, MySQL and PHP has its own settings and its own files (datas
for MySQL).
Using wampserver
The “www” directory will be automatically created (usually c:\wamp\www)
Create a subdirectory in “www” and put your PHP files inside.
Click on the “localhost” link in the WampSever menu or open your internet browser and
go to the URL : http://localhost
Et Voila!
Double click on the downloaded file and just follow the instructions. Everything is
automatic. The WampServer package is usually delivered with the latest
releases of Apache, MySQL and PHP.
Once WampServer is installed, you can add other releases by downloading them on this
website. They will then appear in the WampServer menu and you will be able to
switch releases with a simple click.
Each release of Apache, MySQL and PHP has its own settings and its own files (datas
for MySQL).
Using wampserver
The “www” directory will be automatically created (usually c:\wamp\www)
Create a subdirectory in “www” and put your PHP files inside.
Click on the “localhost” link in the WampSever menu or open your internet browser and
go to the URL : http://localhost
Et Voila!
or XAMPP
http://www.apachefriends.org/en/xampp-windows.html
The Apache Server combined with the power of PHP, MySQL, and phpMyAdmin, creates one of the best possible development environments for a web programmer. Getting everything properly configured can take 20-30 minutes. And it can work on a non expensive OS such as Windows XP or Windows 7 Home Edition.
Installing Apache:
Follow the steps carefully.
1 Go to http://httpd.apache.org/download.cgi and download "Win32 Binary (MSI Installer): apache_2.2.4-win32-x86-no_ssl.msi" to your desktop.
Note: Make sure that you download Apache version 2.2.4 (Win32 Binary MSI Installer)!
2 Double click "apache_2.2.4-win32-x86-no_ssl.msi", and if prompted, click "run".
3 An installation wizard will appear:
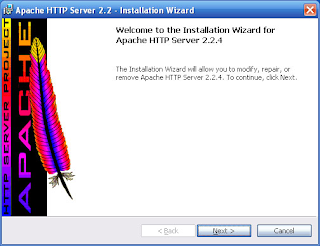
Click "Next".
4 The next page contains the terms of agreement. Select "I accept", and click "Next".
5 Read about the Apache Server, and click "Next"
6 The next screen will ask you for specific server information. Enter the values seen below:
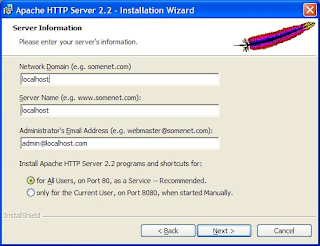
Click "Next".
7 On the next screen, select "Typical Installation" and click "Next".
8 Click "Next".
9 Click "Install".
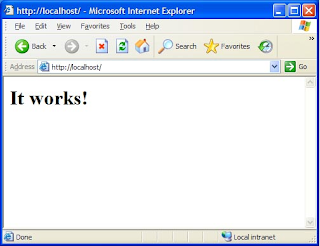
10 Open up Internet Explorer and type in "http://localhost". If you see a page that says "It works!" then the Apache server has been installed successfully.
Note that if you install Flash Media Server an other instance of Apache will be installed which could cause conflict on the following default Apache server. It would be nice if the FMS team could handle this nicely in their installer....
A few notes on your Apache Server Configuration:
Apache is installed by default in your "C:\Program Files\Apache Software Foundation\Apache2.2" directory.
Inside that directory there is a folder called "htdocs" (matching of your \www\ or \public_html\ directory on a unix system). You can develop your applications inside this folder and access them by going to http://localhost/my_file_name.html
The Apache Configuration settings are defined in a file named "httpd.conf" located in the "conf" directory. Do not attempt to change these settings unless you know what you're doing.
Installing PHP:
Next we will be installing PHP version 5. Follow the steps carefully.
1 Go to http://www.php.net/downloads.php and download the "PHP 5.2.0 zip package" to your desktop. (Be patient while it downloads, the ZIP file is over 9MB!)
Note: Make sure that you download the PHP 5.2.0 zip package! The rest of the tutorial is written using this version.
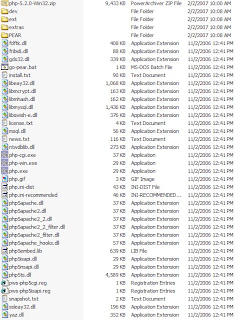
2 Create a new folder called "php" in your C Drive. Copy the "php-5.2.0-Win32.zip" file to there ("C:\php") and extract it using WinZIP or a similiar program.
3 Your "C:\php" directory should now look like:
4 Next copy the "php.ini-dist" file from "C:/php/" to "C:/WINDOWS" and rename it to "php.ini". This is your PHP configuration file. We'll come back to this later.
5 Now it's time to tell Apache that PHP exists. Open up your Apache configuration file ("C:\Program Files\Apache Software Foundation\Apache2.2\conf\httpd.conf") in notepad and add these four lines to the bottom of the "LoadModule" section:
LoadModule php5_module "c:/php/php5apache2_2.dll"
AddHandler application/x-httpd-php .php
# configure the path to php.ini
PHPIniDir "c:/windows"
6 In your "htdocs" directory, create a file called "info.php". Open it in notepad and add this line of code to it:
7 Restart your Apache Server for the changes to take effect:
Start > All Programs > Apache HTTP Server 4.2.4 > Control Apache Server > Restart
or faster use the Apache Service Monitor seating in the tray icon bottom right bar on Windows XP
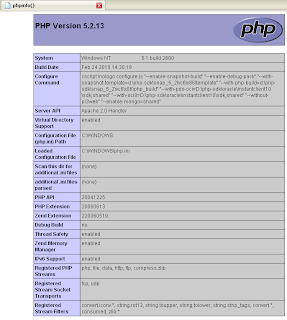
8 Open up Internet Explorer and type in: http://localhost/info.php. If your browser takes you to a page that looks like this, then PHP has been installed successfully!
Modifying your PHP Configuration File:
1 Your PHP configuration (php.ini) file is located in "C:/WINDOWS/php.ini". You can modify it with notepad or a similiar text editor. My favorite is Notepad++
2 Open it up and find the line that says:
extension_dir = "./"
and change it to
extension_dir = "C:\php\ext"
Find the line that says:
;session.save_path = "/tmp"
and change it to
session.save_path = "C:\WINDOWS\temp"
Installing MYSQL:
Next we will be installing MySQL version 5.
Follow the steps carefully.
1 Go to http://dev.mysql.com/downloads/mysql/5.0.html#downloads and download the "Windows (x86) ZIP/Setup.EXE (version 5.0.27)" to your desktop. (To do this you'll need to register an account with MySQL.)
2 Once "mysql-5.0.27-win32.zip" has finished downloading, you can extract it using WinZIP or a similiar program.
3 Once extracted, double click on the "Setup.exe" file. An installation wizard will appear.
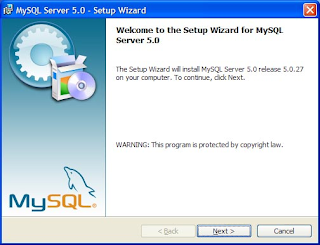
Click "Next".
4 Select "Typical" Installation and click "Next".
5 Click "Install". (Be patient, this can take up to several minutes).
6 The next screen will ask you to "Sign Up". Select "Skip Sign-Up" for now.
7 The next screen will tell you that the installation wizard is complete. Make sure that the "Configure the MySQL Server now" field is checked before clicking "Finish".
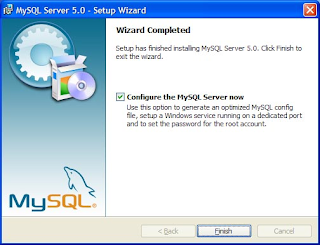
8 The MySQL Server Instance Configuration Wizard should appear. Click "Next".
9 Select "Detailed Configuration" and click "Next".
10 Select "Developer Machine" and click "Next".
11 Select "Multifunctional Database" and click "Next".
12 Click "Next".
13 Select "Decision Support (DSS)/OLAP" and click "Next".
14 Select "Multifunctional Database" and click "Next".
15 Make sure "Enable TCP/IP Networking" is checked, the Port Number is set to "3306", and "Enable Strict Mode" is checked. Click "Next".
16 Select "Standard Character Set" and click "Next".
17 Check "Install As Windows Service", set the Service Name to "MySQL", and check "Launch the MySQL Server automatically". Make sure that the "Include Bin Directory in Windows Path" is NOT checked. Click "Next".
18 On the next screen, check the box that says "Modify Security Settings". Enter a password for the default "root" account, and confirm the password in the box below. Do NOT check the boxes "Enable root access from remote machines" or "Create An Anonymous Account". Click "Next".
19 Click "Execute". (This may take a few minutes. Be patient).
20 Click "Finish".
21 To test if MySQL was installed correct, go to: Start > All Programs > MySQL > MySQL Server 5.0 > MySQL Command Line Client. The MySQL Command Line Client will appear:
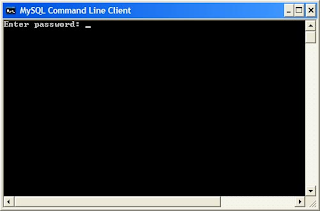
22 It will ask you for a password. Enter the password you created in step 18. (If you enter an incorrect password MySQL will automatically close the command line)
23 Next, type in the commands shown below: (shown in blue)
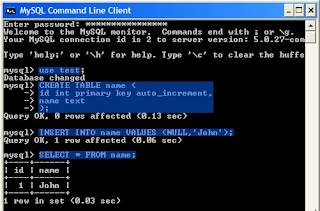
If you don't get any errors, and it returns the information shown above, then MySQL has been successfully installed! Next we will need to configure PHP to work with MySQL.
Configuring PHP to work with MySQL:
Now that both PHP and MySQL are installed, we have to configure them to work together.
1 Open up your php.ini file (C:/WINDOWS/php.ini) and find the line:
;extension=php_mysql.dll
To enable the MySQL extension, delete the semi-colon at the beginning of that line.
2 Next we must add the PHP directory to the Windows PATH. To do this, click: Start > My Computer > Properties > Advanced > Environment Variables. Under the second list (System Variables), there will be a variable called "Path". Select it and click "Edit". Add ";C:\php" to the very end of the string and click "OK".
3 Restart your computer for the changes to take effect.
4 Create a new file in your "htdocs" directory called "mysql_test.php".
5 Copy the following code into "mysql_test.php" and click save. (Make sure to replace the MYSQL_PASS constant with the MySQL Password you specified during the MySQL installation).
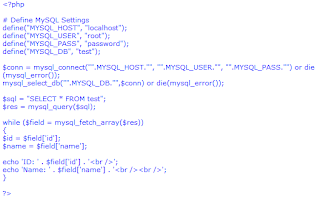
6 Open up Internet Explorer and type in "http://localhost/mysql_test.php". If the "mysql_test.php" page returns something similiar to:
ID: 1
Name: John
Then PHP & MySQL have been successfully configured to work together. Congratulations! The next and final step is to install phpMyAdmin.
Installing phpMyAdmin:
Now that both Apache, PHP and MySQL are installed, we can install phpMyAdmin, a tool that allows you to easily manage your MySQL databases.
1 Go to http://www.phpmyadmin.net/home_page/downloads.php and download "english.zip" under the phpMyAdmin 2.9.2 section to your desktop (I assume that since you are reading this article that you understand English).
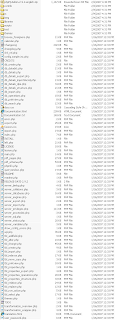
2 Create a new folder called "phpmyadmin" in your "htdocs" directory. Extract the contents of the "phpMyAdmin-2.9.2-english.zip" ZIP file here. Your C:\Program Files\Apache Software Foundation\Apache2.2\htdocs\phpmyadmin" directory should now look like:
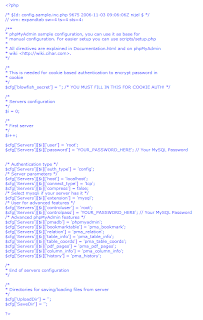
3 Create a new file in the "phpMyAdmin" directory (above) called "config.inc.php". Place this code inside it and be sure to replace "YOUR_PASSWORD_HERE" (in both places below) with your MySQL Password:
4 phpMyAdmin has now been successfully installed! To use it, open up Internet Explorer and type in "http://localhost/phpmyadmin". This will bring you to the main phpMyAdmin page. Note is is always recommended not to install admin tool in default location if deployed on a server open to internet access for security reason.
Enjoy using Apache, PHP, MySQL, and phpMyAdmin!
Thursday, March 18, 2010
Tuesday, March 16, 2010
My Favorites Flash AS3 Component/FLA Part II
3D BUSINESS CARD SLIDE SHOW AS3
This is a XML controlled 3D slideshow, very easy to use and very customizable. It uses the 3D functions of Flash Player 10 (you need to install it if you do not have it); you need Flash CS4 if you want to open the FLA file!
This component can be used as a simple image/product slideshow, a 3d banner rotator or a business card slide show.
Settings you will find in the XML file:
- component width and height and card holder width and height
- mask width and height (you can display one image at a time or multiple images at once)
- transition times and types
- space between the cards
- arrows positioning, description positioning and transparency and also description text (html text)
http://activeden.net/item/3d-business-card-slide-show-as3/91738
AMAZING TWO LEVELS ACCORDION MENU AS3
This is an AS3 vertical accordion menu, XML driven and resizable. It has a structure of two levels. Each main item can have a submenu or it can open a link. For each item you can set a title and a HTML formatted description.
XML Settings:
- component width and height
- main item width and minimum height
- animation time
- items title and description
- items thumbnail image (optional)
- items link and link target
http://activeden.net/item/amazing-two-levels-accordion-menu-as3/88453
HORIZONTAL RESIZABLE ULTRA MENU AS3
This amazing menu can host an virtually UNLIMITED number of items organized on an unlimited number of levels.
The menu can auto-hide or stay visible, all colors can easily be changed in the xml file and.
It also supports scrolling, so if you have a lot of menu items (on any level) they will be scrolled if they don’t fit inside the display area.
This menu is ideal for displaying a great amount of menu items in a well structured manner.
It can open urls or trigger actions in flash !
Each level can have a style (colors, spacing etc.) assigned by specifying the xml corresponding to the specific style !
Settings you can change in the XML file (35+):
- auto-hide on/off
- open sub menu on click or on mouse-over
- open direction down or up
- auto-hide wait time
- sub-level open speed, transition time and type (ex. easeOutQuad)
- sub-level close speed, transition time and type
- use temporary display bar for auto-hide on/off, bar height, hit zone height, bar text (ex. “Move over to open”), bar background color, text color, arrow color
- menu width (can be set to 0 in order to make it expand to the entire stage)
- horizontal item spacing
- menu alignment
* Each style has the following options (each level can have a style xml assigned) :
- background colors for normal, mouse over and selected states
- delimiter width
- delimiter color
- button height
- text padding
- text font size
- text colors for normal, mouse over and selected states
- alignment for the level (left/center/right)
* Each menu item has the following options :
- menu item text (display label)
- action type (link or actionscript)
- url and target for link
- gotoandstop/gotoandplay and frame label/number for action
http://activeden.net/item/horizontal-resizable-ultra-menu-as3/88606
AS3 BUTTON CLASS
* Item Details
* Discussion
3comments
AS3 Button Class
by Flactor
Very easy to use class! you just need to use the interface to make the button and copy the code provided with the interface, then open a new fla file and paste the code in the first frame actions panel and import the needed font in the library and finished! Using this class you could arrange unlimited number of buttons, horizontally or vertically in 3 styles (simple, gradient and web 2.0). Complete documentation with examples and interface are available in the source file.
Could be used both in “time line” and “document Class”.
http://activeden.net/item/as3-button-class/81946
iButton TOGGLE SLIDER
Update: the sliders can now be dragged ON or OFF using the mouse.
All 100% vector graphics.
Easy to implement into your flash file. Just copy & paste!
Customizable settings:
* the text displayed for the ON and OFF states
* the easing used for the sliding animation
* the duration of the sliding animation
* the default state (ON or OFF )
* a callback function to run when the button has been toggled.
Font used on button: Lucida Gr
http://activeden.net/item/ibutton-toggle-slider/78111
POWERFULL FLASH ACCORDION MENU UNLIMITED LEVELS V3
This flash component allows you to create accordion menu’s and combobox’s in a few minutes and customize every detail without opening the flash file, because everything is xml driven.
As it says in the title, using this component you can create accordion menu’s with as many levels as you set in the xml file, there is no limit. Also you can customize each level individually, allowing you to create complex menus and desings.
In this new version you can set 4 different actions for the button, such as launch a link, go to a frame, load an image/swf or call a function.
Also this menu includes some nice API features that allows you to manipulate/navigate the menu dynamically.
http://activeden.net/item/powerful-flash-accordion-menu-unlimited-levels-v3/75262
CLEAM MEDIA PLAYER BUTTONS
Simple and easy to use and modify.
A collection of media player buttons,clean and modern, glossy, completely resizable vectors.
Just copy/paste or drag the buttons into your own project. It’s that easy.
The Zip contains an CS4 Fla, CS3 Fla, CS AI file and CS EPS file. I have included the Illustrator vectors in the pack.
For additional help contact me here at Graphic River or you can find my email address in the help file that comes with this product.
Tags: media player, buttons, player, style, clean, glossy, gloss, play, pause, stop, next, previous, forward, backward, star
http://activeden.net/item/clean-media-player-buttons/69078
AS3 WEB 2.0 BUTTON CLASS
Features:
Label, Label Color, Label Size, Font name, Colors of button layers(up, over, down), Width, Height, x Margin, y Margin, corner curves, ButtonMode, dropShadow, Activeness.
Can be used both in Document Class and time line.
http://activeden.net/item/as3-web-20-button-class/63030
THE SPINE XML IMAGE MENU
The Spine XML Image Menu is an image based menu with lots of flexibility that is straight-forward and simple, but also fun and creative. It scales the menu image items on mouse over and you can also choose to have a tooltip. On click, the menu will link out to a URL . If the stage is wider than the menu, the menu will be centered, otherwise, if the menu is wider than the stage, it will scroll left to right on the mouse’s horizontal position. It works great as a products menu that would link out to the specific product page.
The menu is XML driven and you can set the following things in the XML file:
– the background color
– the width of the menu items
– the height of the menu items
– the thickness of the border on mouse over of the menu items
– the amount of scaling on mouse over of the menu items
– whether the tooltip is on or off
– the background color of the tooltip
– the background transparency of the tooltip
– the image/SWF path for each of the menu items
– the tooltip text for each of the menu items
– the link URL for the on click of each of the menu items
– the link target for the on click of each of the menu items
So you can have as many images/SWFs as you want and they can be any size you want!
http://activeden.net/item/the-spine-xml-image-menu/50142
XML VERTICAL ACCORDION
XML Accordion generated from XML .
Each item in the xml has a title and a content attribute, allowing the flash file to load external contents into each item. The example above loads .jpg images, but these can be .swf, .png, .gif. (Basically any format allowed by Loader.load())
* Easy do edit xml file
* add as many items as your site can handle
* change which item opens by default
* clearly labeled layers and symbols for easy editing
http://activeden.net/item/xml-accordion/36743
HORIZONTAL XML ACCORDION
XML Accordion generated from XML .
Each item in the xml has a title and a content attribute, allowing the flash file to load external contents into each item. The example above loads .jpg images, but these can be .swf, .png, .gif. (Basically any format allowed by Loader.load())
* Easy do edit xml file
* add as many items as your site can handle
* change which item opens by default
* clearly labeled layers and symbols for easy editing
http://activeden.net/item/horizontal-xml-accordion/43382
PREMIUM TWO LEVEL EXPANDING MENU
Premium Two Level Expanding Menu
This is an XML driven vertical expanding menu designed to be clean, functional, easy to implement, and very customizable. All graphics are vector, and all is editable incliding colors, sizes, fonts etc easily from Flash. Each button either expands to show a sub menu, or links out to a url (“_self” or “_blank” can be set). You can also call javascript functions with it as well.
http://activeden.net/item/premium-two-level-expanding-menu/23880
CIRCLE MENU
Highly customizable menu made in ActionScript 3.
Any number of items with own colors and selected colors are supported. Many editable properties which vary the look and feel a lot.
Properties :
innerRadius, radius, angle, radiusDecrement, angleDecrement, angleIncrement, motionType, motionTime
http://www.ultrashock.com/#/asset/39553/circle-menu.html
ODOMETER AS3
A number Odometer - will 'odo' to any number it's set to, up or down, from any number it was last set to. Useful for Game score displays, hit counters etc.
http://www.ultrashock.com/#/asset/43513/odometer-as3.html
FLASH TOOLTIP AS3 V1.0.3
The flashTooltip component allows you to easily add a descriptive window that appears when the user moves their mouse over Flash buttons or movie clips. The tooltip may contain text, images or SWF's. Includes 5 built-in opening and closing effects. Fully customizable. .
http://www.ultrashock.com/#/asset/42610/flashtooltip-as3-v1.0.3.html
PROP3D 60s TV
Prop3D is a unique interactive Papervision3D media player component which can be customized and preloaded with your original videos, images & audio. The player itself is a 3D object, and can auto spin or be mouse tracked in a 3D space.
Prop3D includes a Collada 3D model and an ActionScript 3 component that loads it in a specific position using the component inspector. The really impressive thing about this component is that it allows you to load videos, images and sounds (displaying an equalizer) over a canvas within the model via an XML playlist. Finally, being able to customize the png meshes which construct the 3D object, makes it the most complete Papervision3D based component on the market.
We've teamed up with Zero Fractal Studios (the makers of the popular Tree3D component) to bring you these premium quality, unique and exclusive UltraComponents. Stay tuned for more!
Additional features include:
* Great Memory and CPU Handling (this feature requires flash player 9.0.115 or higher).
* Data Driven - Prop3D loads information from XML objects so you can customize your play list according to your needs.
You can also modify the play list with the API.
* Customizable mouse interaction - You can set the prop to face the mouse vertically, horizontally or both, with the screen always visible, or configure it by simple API calls.
Auto Spin Spin Speed - You can set the prop to spin automatically and change its speed, even with mouse interaction.
* Model customization - You can create your own props or use the props adding elements to the scene.
* Customizable UI Settings - Developers can easily customize every possible aspect of the prop display: position, rotation, camera, and even mouse interaction. .
http://www.ultrashock.com/#/asset/45591/prop3d-60s-tv.html
PROP3D MACBOOK
rop3D is a unique interactive Papervision3D media player component which can be customized and preloaded with your original videos, images & audio. The player itself is a 3D object, and can auto spin or be mouse tracked in a 3D space.
Prop3D includes a Collada 3D model and an ActionScript 3 component that loads it in a specific position using the component inspector. The really impressive thing about this component is that it allows you to load videos, images and sounds (displaying an equalizer) over a canvas within the model via an XML playlist. Finally, being able to customize the png meshes which construct the 3D object, makes it the most complete Papervision3D based component on the market.
http://www.ultrashock.com/#/asset/45589/prop3d--macbook.html
LOADBAR
Very easy to implement, use, and customise. Loadbar can be used for any file loading process. The progress bar is resized using some simple tweening to produce a smooth animation.
http://www.ultrashock.com/#/asset/38155/loadbar.html
CUSTOMCURSOR
CustomCursor is an AS3 class that allows you to quickly and easily add custom cursors to your Flash movies. Custom cursors can be created from bitmap images or MovieClips, so there really is no limit to the custom cursor designs you want to create.
Setting up your custom cursors is effortless. You simply tell the CustomCursor class which custom cursor an interactive object should use, and the everything is taken care of for you. Adding a drop shadow to your custom cursors is as simple as passing a DropShadowFilter to the CustomCursor class.
If you want to get cursor creative, CustomCursor is probably the only class you will need.
http://www.ultrashock.com/#/asset/37933/customcursor.html
http://www.ultrashock.com/#/asset/38155/loadbar.html
Subscribe to:
Posts (Atom)